0,配置好租户的事宜和数据建表,天生租户,触发各种bootstrap初始化。1,租户域名–》识别租户–》切换租户数据库–》切换各种资源–》运行运用–》运行相应任务命令2,主域名–》识别管理中央–》切换主数据库–》运行管理后台–》管理租户
第一:先安装laravel-shop源码:https://github.com/summerblue/laravel-shop/tree/L05_8.x安装后,大略运行一下是否正常,然后我们接下来把它改造成SaaS.

源码: https://github.com/archtechx/tenancy
composer require stancl/tenancy
php artisan tenancy:install
安装后天生:migrations, config file, route file and a service provider然后 ,实行数据库迁移,天生 tenants 租户表,domains 域名表:
php artisan migrate
然后,注册 tenant包的 做事供应者,service provider inconfig/app.php.
一样平常来说,会继续原来的Tenant model, 进一步修正,同时也要在config/tenancy.php 配置好 Model:
'tenant\_model' => \App\Models\Tenant::class,
这样!
就算安装好了!
下一步,我们要配置好 SaaS多租户的功能。
当新建租户的时候,会触发事宜任务,例如实行 天生数据库CreateDatabase,迁移数据migration,填充数据seeder等等,在文件TenancyServiceProvider这里是配置 任务:
public function events() { return [ // Tenant events Events\CreatingTenant::class => [], Events\TenantCreated::class => [ JobPipeline::make([ Jobs\CreateDatabase::class, Jobs\MigrateDatabase::class, //Jobs\SeedDatabase::class, CreateFrameworkDirectoriesForTenant::class, //建立租户文件夹 UpdateAdminMenuForTenant::class //更新租户数据表 // Your own jobs to prepare the tenant. // Provision API keys, create S3 buckets, anything you want! ])->send(function (Events\TenantCreated $event) { return $event->tenant; })->shouldBeQueued(false), // `false` by default, but you probably want to make this `true` for production. ],第四,配置管理中央路由(Central routes):
在app/Providers/RouteServiceProvider.php 修正途由,这样就可以进入管理中央的路由,而不是进入租户的路由:
public function boot(){ $this->configureRateLimiting(); $this->mapWebRoutes(); $this->mapApiRoutes();} protected function mapWebRoutes(){ foreach ($this->centralDomains() as $domain) { Route::middleware('web') ->domain($domain) ->namespace($this->namespace) ->group(base_path('routes/web.php')); }}protected function mapApiRoutes(){ foreach ($this->centralDomains() as $domain) { Route::prefix('api') ->domain($domain) ->middleware('api') ->namespace($this->namespace) ->group(base_path('routes/api.php')); }}protected function centralDomains(): array{ return config('tenancy.central_domains');}第五,配置租户路由(Central routes):
在routes/tenant.php 配置租户的路由, PreventAccessFromCentralDomains的Middleware中间件是过滤掉不准主域名进入。InitializeTenancyByDomain是识别租户。
Route::middleware([ 'web', InitializeTenancyByDomain::class, PreventAccessFromCentralDomains::class,])->group(function () { Route::get('/', function () { return 'This is your multi-tenant application. The id of the current tenant is ' . tenant('id'); });});第六,配置数据迁移Migrations
手动把database/migrations 干系须要迁移的文件 复制到 database/migrations/tenant 里面。当实行租户数据迁移时候就会自动实行,天生租户须要的数据表:
php artisan tenants:migrate末了,天生租户测试:
Tenant 是天生租户,而Domain是绑定租户Tenant,访问域名进行识别租户:
$ php artisan tinker>>> $tenant1 = App\Models\Tenant::create(['id' => 'foo']);>>> $tenant1->domains()->create(['domain' => 'foo.localhost']);>>>>>> $tenant2 = App\Models\Tenant::create(['id' => 'bar']);>>> $tenant2->domains()->create(['domain' => 'bar.localhost']);
这时候,你可以浏览器访问 ‘foo.localhost’ ,就能够进入 租户的运用前端了。(注:要在hosts绑定域名和本地ip)租户的运用前端:
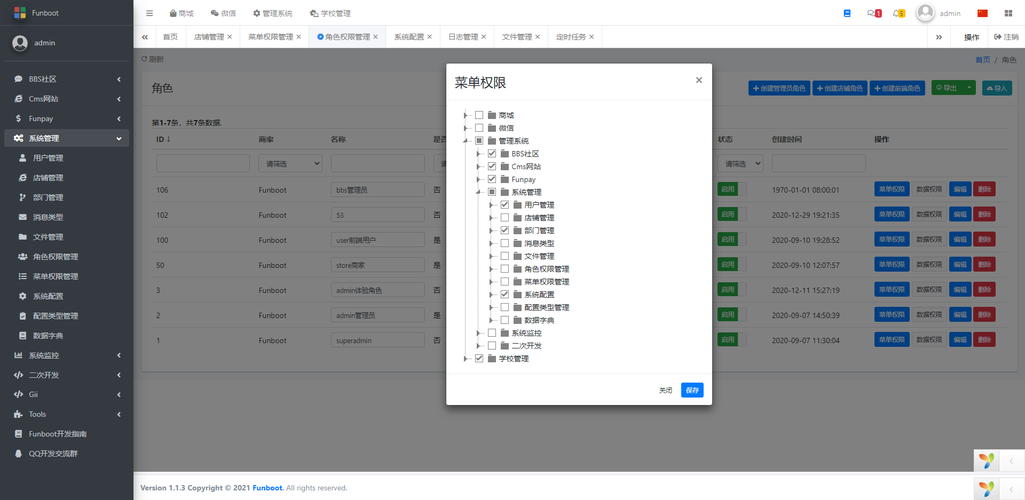
租户后台:
管理中央后台:
同时,可以在代码里面对租户进行如下操作:
App\Models\Tenant::all()->runForEach(function () { App\Models\User::factory()->create(); // 切换租户,实行操作});
完成!
以上便是多租户SaaS的基本安装和配置。下面详细说说配置的知识点。
'tenant_model' => \App\Models\Tenant::class, //配置好 Tenant和Domain的class
'central_domains' => [ str_replace(['https//', 'http//'], '', env('APP_URL')), ], // 配置好 管理中央的URL
//租户识别后,启动资源隔离:'bootstrappers' => [ Stancl\Tenancy\Bootstrappers\DatabaseTenancyBootstrapper::class, Stancl\Tenancy\Bootstrappers\CacheTenancyBootstrapper::class, Stancl\Tenancy\Bootstrappers\FilesystemTenancyBootstrapper::class, Stancl\Tenancy\Bootstrappers\QueueTenancyBootstrapper::class, // Stancl\Tenancy\Bootstrappers\RedisTenancyBootstrapper::class, // Note: phpredis is needed ],2, TenancyServiceProvider.php 配置:
2.1 Events\TenantCreated (租户天生时)配置:租户天生时,详细实行的天生任务配置,这里举例几个:
····public function events() { return [ // Tenant events Events\CreatingTenant::class => [], Events\TenantCreated::class => [ JobPipeline::make([ Jobs\CreateDatabase::class, //天生数据库 Jobs\MigrateDatabase::class, //迁移数据表 //Jobs\SeedDatabase::class, //填充数据 CreateFrameworkDirectoriesForTenant::class, //天生租户文件夹 UpdateAdminMenuForTenant::class //更新租户数据内容 // Your own jobs to prepare the tenant. // Provision API keys, create S3 buckets, anything you want! ])->send(function (Events\TenantCreated $event) { return $event->tenant; })->shouldBeQueued(false), // `false` by default, but you probably want to make this `true` for production. ], Events\SavingTenant::class => [],·····
例如,更新数据表内容如下:
例如,天生租户文件夹如下:
2.2 boot() 启动租户任务配置:
public function boot() { $this->bootEvents(); //启动事宜监听 $this->mapRoutes(); //启动路由监听 $this->makeTenancyMiddlewareHighestPriority(); //以下是我们添加的 自定义配置 InitializeTenancyByDomain::$onFail = function () { return redirect(env('APP_URL')); //租户访问失落败,跳转主访问 }; TenantAssetsController::$tenancyMiddleware = InitializeTenancyByDomainOrSubdomain::class; // 静态资源干系. // 租户自定义配置. // @see https://tenancyforlaravel.com/docs/v3/features/tenant-config TenantConfig::$storageToConfigMap = [ // Do whatever you want. ]; DomainTenantResolver::$shouldCache = true; //租户路由缓存配置 } protected function mapRoutes() { if (file_exists(base_path('routes/tenant.php'))) { Route::namespace(static::$controllerNamespace) ->group(base_path('routes/tenant.php')); } }3,migration 和 seeder 初始化数据 配置
在config/tenancy.php 可以配置干系参数,我的习气是 不要seeder,直接把有须要的seeder做成 一个migration,直接实行migration。
/ Parameters used by the tenants:migrate command. / 'migration_parameters' => [ '--force' => true, // This needs to be true to run migrations in production. '--path' => [database_path('migrations/tenant')], '--realpath' => true, ], / Parameters used by the tenants:seed command. / 'seeder_parameters' => [ '--class' => 'DatabaseSeeder', //'TenantDatabaseSeeder', // root seeder class //'--force' => true, ],4,路由配置:
这里须要的路由配置有:中央运用路由,管理中央路由,租户运用路由,租户管理后台路由。4.1 管理中央的路由配置 app/Admin/routes.php例子如下 :
/ 超级管理员可以通过此路由进入租户后台. /Route::group([ 'prefix' => config('admin.route.prefix'), 'namespace' => config('admin.route.namespace'), 'middleware' => config('admin.route.middleware'), 'domain' => config('tenancy.central_domains')[0], //限定管理中央域名才能进入], function (Router $router) { // 租户管理 $router->resource('/tenant', 'TenantController'); // 域名管理 $router->resource('/domain', 'DomainController')->only(['index', 'destroy', 'show']); $router->get('/', 'HomeController@index'); $router->get('users', 'UsersController@index'); $router->get('products', 'ProductsController@index'); });
4.2 租户管理中央的路由配置 app/Admin/routes.php例子如下 :
/ 租户管理员可以通过此路由进入租户后台. /Route::middleware([ 'web','admin', // 要经由管理员登录验证 CheckTenantForMaintenanceMode::class, //检讨是否掩护状态 ScopeSessions::class, InitializeTenancyByDomain::class, //识别租户,实行切换资源 PreventAccessFromCentralDomains::class, //防止管理中央访问的混入]) ->prefix(config('admin.route.prefix')) ->namespace(config('admin.route.namespace')) ->group(function (Router $router) { $router->get('/', 'HomeController@index'); $router->get('users', 'UsersController@index'); $router->get('products', 'ProductsController@index'); $router->get('products/create', 'ProductsController@create'); $router->post('products', 'ProductsController@store'); $router->get('products/{id}/edit', 'ProductsController@edit'); $router->put('products/{id}', 'ProductsController@update'); // 开启上帝模式,管理中央是可以直接访问租户后台 $router->get('/god/{token}', function ($token) { return UserImpersonation::makeResponse($token); }); });
4.3 中央运用路由的路由配置 routes/web.php例子如下 :
//便是普通平时的路由,不须要阐明Route::get('/', 'PagesController@root')->name('root');Auth::routes();// 在之前的路由里加上一个 verify 参数Auth::routes(['verify' => true]);Route::get('products/favorites', 'ProductsController@favorites')->name('products.favorites');// auth 中间件代表须要登录,verified中间件代表须要经由邮箱验证Route::group(['middleware' => ['auth', 'verified']], function() { Route::get('user_addresses', 'UserAddressesController@index')->name('user_addresses.index');
4.4 租户运用的路由配置 routes/tenant.php例子如下 :
Route::middleware([ 'web', InitializeTenancyByDomain::class, //识别租户,切换资源 PreventAccessFromCentralDomains::class, //防止中央运用的访问混入])->group(function () {Route::get('/', 'PagesController@root')->name('root'); Auth::routes(); // 按正常的用户验证就可以 // 在之前的路由里加上一个 verify 参数 Auth::routes(['verify' => true]); Route::get('products/favorites', 'ProductsController@favorites')->name('products.favorites'); // auth 中间件代表须要登录,verified中间件代表须要经由邮箱验证 Route::group(['middleware' => ['auth', 'verified']], function() { Route::get('user_addresses', 'UserAddressesController@index')->name('user_addresses.index');·········路由知识点:
中央central 和 租户tenants 路由 的 相互限定办法:
'domain' => config('tenancy.central_domains')[0], //限定管理中央域名才能进入
PreventAccessFromCentralDomains::class, //防止中央运用的访问混入租户基本命令:
1,租户命令:
php artisan tenants:migratephp artisan tenants:migrate --seedphp artisan tenants:migrate-fresh --seedphp artisan tenants:seed --tenants=XXXXphp artisan tenants:run larabbs:calculate-active-userphp artisan tenants:run email:send --tenants=8075a580-1cb8-11e9-8822-49c5d8f8ff23 --option="queue=1"--option="subject=New Feature"--argument="body=We have launched a new feature. ..."
2,cron Kernel 配置租户实行命令办法:
$schedule->command('tenants:run larabbs:calculate-active-user')->everyMinute()->withoutOverlapping(); 多租户的图片资源利用办法:
默认是不对的地址:
http://foo9.larashop.test/storage/images/%E5%BE%AE%E4%BF%A1%E5%9B%BE%E7%89%87\_20211116190644.jpg
精确的图片地址该当是这样,有 tenancy/assets :
http://foo9.larashop.test/tenancy/assets/images/%E5%BE%AE%E4%BF%A1%E5%9B%BE%E7%89%87\_20211116190644.jpg
以是要图片资源的函数方法:
public function tenancyUrl($path){if (URL::isValidUrl($path)) {return $path;}if (tenant()) {return tenant_asset($path); // 这里是关键,会转换租户地址}return $this->getStorage()->url($path);}其他资源的隔离把稳:
行列步队,redis, redis缓存 , 多租户, 文件独立 等都须要把稳隔离的配置。
例如:文件缓存的报错, 有些资源是须要用tenant-aware的,如配置利用redis。This cache store does not support taggingHi. If you want your cache to be tenant-aware, you need to use a driver that supports tagging, e.g. Redis.If you don’t need tenant-aware cache, comment out the CacheTenancyBootstrapper in your tenancy.php config file.
代码的github地址:为了方便参考,这里供应我的github地址,有干系代码参考:https://github.com/liangdabiao/laravel-shop-saas所有账号密码都是 admin admin后台 /admin
同时也可以参考我的论坛SaaS代码,另一种办法:https://github.com/liangdabiao/bbs-saas-skeleton