这下让我产生疑问,为什么内存险些被占满了,jvm还不进行FullGC呢?
于是我通过命令docker exec -it <容器ID> jmap -dump:file=<filename> <pid>来天生dump快照文件,还有获取项目中的gc日志。而且通过MAT剖析dump、利用gcviewer剖析GC日志。
MAT剖析工具 https://www.eclipse.org/mat/downloads.php gcviewer https://github.com/chewiebug/GCViewer/releases

先来看看GC日志情形
java -jar ./gcviewer.jar service_gc.log
这里可以看到总的GC停息次数和韶光,和FullGC停息次数和韶光
项目刚刚启动时,GC情形,jvm堆内存逐步变大,黄色代表年轻代,紫色代表老年代。
到末了的阶段
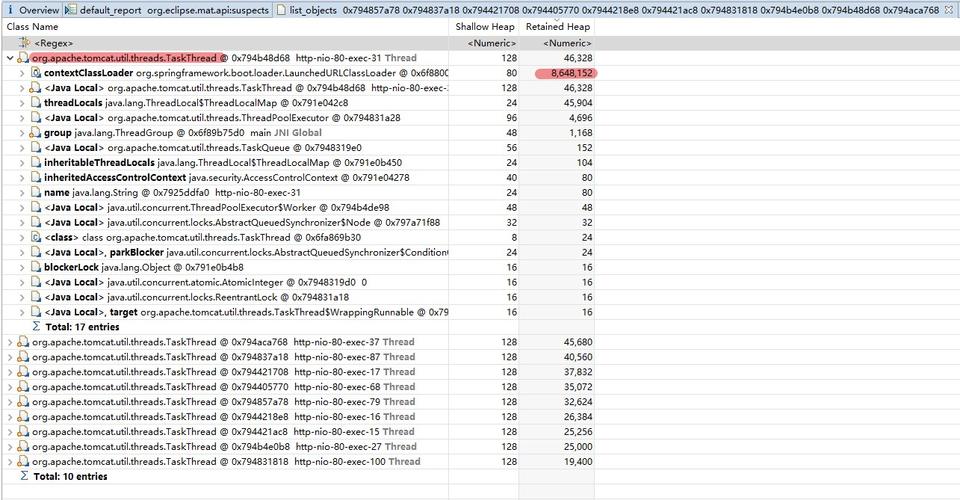
我们再来看看MAT剖析情形是若何:
涌现两个可能发生内存溢出的问题
byte[]占用堆内存比例约为46.24%有61个实例Http11OutputBuffer被系统加载,统共耗费内存46.16%这里的指向的问题的线程是org.apache.tomcat.util.threads.TaskThread
连续往下看,创造跟我们项目有点靠近的东西tk.mybatis.mapper.mapperhelper.EntityHelper,这个是实体类工具类 - 处理实体和数据库表以及字段关键的一个类。我们利用了这个插件,相信大家用过mybatis都会知道MyBatisPlus,实在tk.mapper做的功能也是和MyBatisPlus差不多。
那么这里为啥会装那么多的tk.mapper工具呢,紧张来源是查数据库后转换实体类而创建的,我们再看看他的GC Roots最近节点
创造都是在org.apache.tomcat.util.threads.TaskThread类引用,我们打开这个类看看源码。
终于找到了与tomcat干系的类了,愉快!
!
!
!
!
public class Nio2Endpoint extends AbstractJsseEndpoint<Nio2Channel,AsynchronousSocketChannel> { ... @Override public void bind() throws Exception { // Create worker collection if (getExecutor() == null) { createExecutor(); // 统一在这个方法创建线程池 } if (getExecutor() instanceof ExecutorService) { threadGroup = AsynchronousChannelGroup.withThreadPool((ExecutorService) getExecutor()); } // AsynchronousChannelGroup needs exclusive access to its executor service if (!internalExecutor) { log.warn(sm.getString("endpoint.nio2.exclusiveExecutor")); } serverSock = AsynchronousServerSocketChannel.open(threadGroup); socketProperties.setProperties(serverSock); InetSocketAddress addr = new InetSocketAddress(getAddress(), getPortWithOffset()); serverSock.bind(addr, getAcceptCount()); // Initialize SSL if needed initialiseSsl(); } ... @Override public void startInternal() throws Exception { if (!running) { allClosed = false; running = true; paused = false; if (socketProperties.getProcessorCache() != 0) { processorCache = new SynchronizedStack<>(SynchronizedStack.DEFAULT_SIZE, socketProperties.getProcessorCache()); } if (socketProperties.getBufferPool() != 0) { nioChannels = new SynchronizedStack<>(SynchronizedStack.DEFAULT_SIZE, socketProperties.getBufferPool()); } // Create worker collection if (getExecutor() == null) { createExecutor(); // 统一在这个方法创建线程池 } initializeConnectionLatch(); startAcceptorThread(); } } ... }/ AprEndpoint利用JNI的接口来得到对Socket的访问 NioEndpoint 同步 Nio2Endpoint 异步 /// 调用 NioEndpoint、Nio2Endpoint、AprEndpoint的父类AbstractEndpoint#createExecutor()方法public abstract class AbstractEndpoint<S,U> { ... // 创建线程池 public void createExecutor() { internalExecutor = true; TaskQueue taskqueue = new TaskQueue(); // 找到了我们的类 TaskThreadFactory TaskThreadFactory tf = new TaskThreadFactory(getName() + "-exec-", daemon, getThreadPriority()); executor = new ThreadPoolExecutor(getMinSpareThreads(), getMaxThreads(), 60, TimeUnit.SECONDS,taskqueue, tf); taskqueue.setParent( (ThreadPoolExecutor) executor); } ...}
上面涉及到Tomcat的网络NIO架构,大家更感兴趣的可以百度搜索干系文章。Nio2Endpoint的浸染大致便是为Http要求分配线程实行,到这里大概明白byte[]数组便是分配在每一个tomact线程中,由于利用了Nio,就会有Buffer观点,那么这部分的内存是不能回收的,系统启动之后就一贯不变。而且随着配置的tomcat线程server.tomcat.maxThreads越多占用的内存空间就越大。
随着配置的tomcat线程越多占用的内存空间就越大?
这个时候我遐想到了配置文件,查看原来配置文件:application.yml
server: port: 80 tomcat: uri-encoding: UTF-8 maxHttpPostSize: 10240000 maxHttpHeaderSize: 10240000 maxThreads: 500 acceptCount: 500 maxConnections: 600 minSpareThreads: 100
可以看到我同时配置了maxHttpPostSize和maxHttpHeaderSize为10MB大小,而且我还配置了500个最大线程,满载时就单单Buffer就要耗费4G的内存。
后面我优化成:application.yml
server: port: 80 servlet: context-path: / tomcat: maxThreads: 400 minSpareThreads: 50
看了源码才创造maxHttpHeaderSize默认配置了8k,maxHttpPostSize默认配置2M,默认情形下是够用了,除非你再header上携带大量的信息。
maxHttpHeaderSize设置源码SpringBoot是通过org.springframework.boot.autoconfigure.web.ServerProperties配置
@ConfigurationProperties(prefix = "server", ignoreUnknownFields = true)public class ServerProperties { / Server HTTP port. / private Integer port; / Network address to which the server should bind. / private InetAddress address; @NestedConfigurationProperty private final ErrorProperties error = new ErrorProperties(); / Whether X-Forwarded- headers should be applied to the HttpRequest. / private Boolean useForwardHeaders; / Value to use for the Server response header (if empty, no header is sent). / private String serverHeader; / Maximum size of the HTTP message header. / private DataSize maxHttpHeaderSize = DataSize.ofKilobytes(8); / Time that connectors wait for another HTTP request before closing the connection. When not set, the connector's container-specific default is used. Use a value of -1 to indicate no (that is, an infinite) timeout. / private Duration connectionTimeout; @NestedConfigurationProperty private Ssl ssl; @NestedConfigurationProperty private final Compression compression = new Compression(); @NestedConfigurationProperty private final Http2 http2 = new Http2(); private final Servlet servlet = new Servlet(); private final Tomcat tomcat = new Tomcat(); private final Jetty jetty = new Jetty(); private final Undertow undertow = new Undertow(); ... public static class Tomcat { ... / Maximum size of the HTTP message header. / private DataSize maxHttpHeaderSize = DataSize.ofBytes(0); @Deprecated @DeprecatedConfigurationProperty(replacement = "server.max-http-header-size") public DataSize getMaxHttpHeaderSize() { return this.maxHttpHeaderSize; } @Deprecated public void setMaxHttpHeaderSize(DataSize maxHttpHeaderSize) { this.maxHttpHeaderSize = maxHttpHeaderSize; } ... }}
查看一下哪里调用getMaxHttpHeaderSize()方法
org.springframework.boot.autoconfigure.web.embedded.TomcatWebServerFactoryCustomizer
org.apache.coyote.http11.AbstractHttp11Protocol是一个抽象类,我们利用的是NIO,则它的子类是org.apache.coyote.http11.Http11AprProtocol
在org.apache.coyote.http11.AbstractHttp11Protocol中maxHttpHeaderSize是如何被调用
在Http11InputBuffer中我们可以查看到有一个init()方法
public class Http11InputBuffer implements InputBuffer, ApplicationBufferHandler { ... public Http11InputBuffer(Request request, int headerBufferSize, boolean rejectIllegalHeaderName, HttpParser httpParser) { this.request = request; headers = request.getMimeHeaders(); this.headerBufferSize = headerBufferSize; this.rejectIllegalHeaderName = rejectIllegalHeaderName; this.httpParser = httpParser; filterLibrary = new InputFilter[0]; activeFilters = new InputFilter[0]; lastActiveFilter = -1; parsingHeader = true; parsingRequestLine = true; parsingRequestLinePhase = 0; parsingRequestLineEol = false; parsingRequestLineStart = 0; parsingRequestLineQPos = -1; headerParsePos = HeaderParsePosition.HEADER_START; swallowInput = true; inputStreamInputBuffer = new SocketInputBuffer(); } ... void init(SocketWrapperBase<?> socketWrapper) { wrapper = socketWrapper; wrapper.setAppReadBufHandler(this); int bufLength = headerBufferSize + wrapper.getSocketBufferHandler().getReadBuffer().capacity(); if (byteBuffer == null || byteBuffer.capacity() < bufLength) { // 创建了一个ByteBuffer,而且它的长度是由headerBufferSize决定的 byteBuffer = ByteBuffer.allocate(bufLength); byteBuffer.position(0).limit(0); } } ...}
我们现在可以连续往上追溯
byteBuffer = ByteBuffer.allocate(bufLength); -> HeapByteBuffer
public abstract class ByteBuffer extends Buffer implements Comparable<ByteBuffer> { ... public static ByteBuffer allocate(int capacity) { if (capacity < 0) throw new IllegalArgumentException(); return new HeapByteBuffer(capacity, capacity); } ...}
class HeapByteBuffer extends ByteBuffer { // For speed these fields are actually declared in X-Buffer; // these declarations are here as documentation / protected final byte[] hb; protected final int offset; / HeapByteBuffer(int cap, int lim) { // package-private super(-1, 0, lim, cap, new byte[cap], 0); / hb = new byte[cap]; offset = 0; / }}
到这里,我们终于找到byte[]创建的地方。按照之前的打算这里创建的byte数组长度为10240000+,还真的挺大的。
末了,我们已经理解jvm占用byte[]数组过多的情形,且也了走了一遍tomcat的源码,对tomcat有更深入的理解。