当时刚学习这个时候,就以为,好牛啊,这样就可以实现一个网站,这群大神是怎么做到的啊,嘿嘿嘿,不知道大家当时有没有这样的问题产生,以是本日就带大家来搭建一个大略的mvc框架,从事理讲起,也能帮助大家更好的理解底层源码
好了,话不多说,我们来看一下

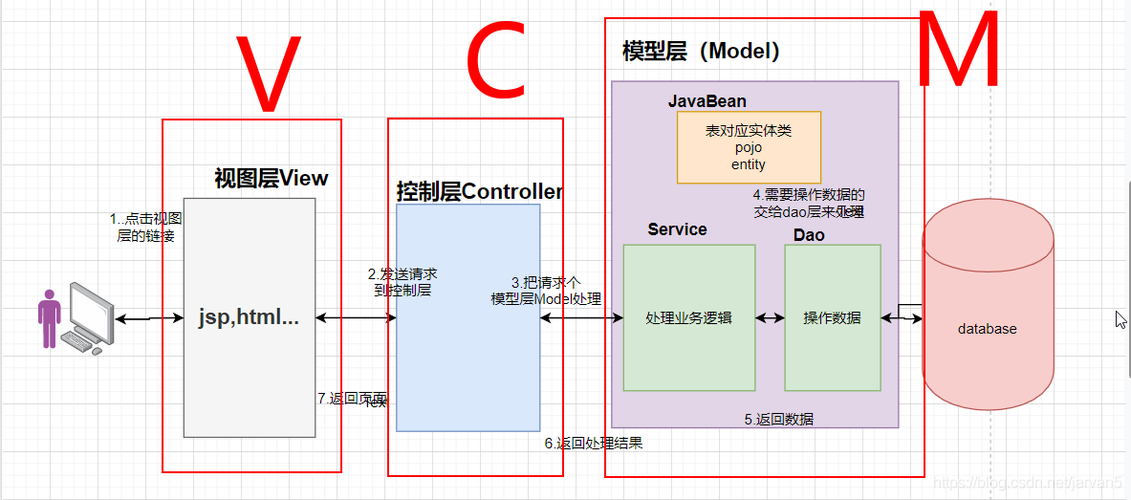
SpringMvc实质上便是对Servlet的封装。
由于创建一个Maven项目,然后在pom文件中增加一个依赖:
<dependency> <groupId>javax.servlet</groupId> <artifactId>servlet-api</artifactId> <version>2.5</version> <!-- 支配在做事器时,不该用这个servlet-api 而利用tomcat的--> <scope>provided</scope></dependency>
2,创建DispatcherServlet,并注册到web.xml中
package com.dxh.edu.mvcframework.servlet;import javax.servlet.ServletConfig;import javax.servlet.ServletException;import javax.servlet.http.HttpServlet;import javax.servlet.http.HttpServletRequest;import javax.servlet.http.HttpServletResponse;import java.io.IOException;public class DxhDispatcherServlet extends HttpServlet { / 吸收处理要求 / @Override protected void doGet(HttpServletRequest req, HttpServletResponse resp) throws ServletException, IOException { doPost(req, resp); } @Override protected void doPost(HttpServletRequest req, HttpServletResponse resp) throws ServletException, IOException { }}
web.xml:
<!DOCTYPE web-app PUBLIC "-//Sun Microsystems, Inc.//DTD Web Application 2.3//EN" "http://java.sun.com/dtd/web-app_2_3.dtd" ><web-app> <display-name>Archetype Created Web Application</display-name> <servlet> <servlet-name>dxhmvc</servlet-name> <servlet-class>com.dxh.edu.mvcframework.servlet.DxhDispatcherServlet</servlet-class> <init-param> <param-name>contextConfigLocation</param-name> <param-value>springmvc.properties</param-value> </init-param> </servlet> <servlet-mapping> <servlet-name>dxhmvc</servlet-name> <url-pattern>/</url-pattern> </servlet-mapping></web-app>2,表明开拓
由于要利用到表明,以是首先要自定义几个表明:
这里就不赘述如何自定义表明了,详情请看:https://www.cnblogs.com/peida/archive/2013/04/24/3036689.html
Controller表明:
@Documented@Target(ElementType.TYPE)@Retention(RetentionPolicy.RUNTIME)public @interface DxhController { String value() default "";}
Service表明:
@Documented@Target(ElementType.TYPE)@Retention(RetentionPolicy.RUNTIME)public @interface DxhService { String value() default "";}
RequestMapping表明:
@Documented@Target({ElementType.TYPE,ElementType.METHOD})@Retention(RetentionPolicy.RUNTIME)public @interface DxhRequestMapping { String value() default "";}
Autowired表明:
@Documented@Target(ElementType.FIELD)@Retention(RetentionPolicy.RUNTIME)public @interface DxhAutowired { String value() default "";}编写测试代码:
测试代码我们放在同项目中的com.dxh.demo包中:
package com.dxh.demo.controller;import com.dxh.demo.service.IDemoService;import com.dxh.edu.mvcframework.annotations.DxhAutowired;import com.dxh.edu.mvcframework.annotations.DxhController;import com.dxh.edu.mvcframework.annotations.DxhRequestMapping;import javax.servlet.http.HttpServletRequest;import javax.servlet.http.HttpServletResponse;@DxhController@DxhRequestMapping("/demo")public class DemoController { @DxhAutowired private IDemoService demoService; / URL:/demo/query / @DxhRequestMapping("/query") public String query(HttpServletRequest request, HttpServletResponse response, String name){ return demoService.get(name); }}
package com.dxh.demo.service;public interface IDemoService { String get(String name);}
package com.dxh.demo.service.impl;import com.dxh.demo.service.IDemoService;import com.dxh.edu.mvcframework.annotations.DxhService;@DxhService("demoService")public class IDemoServiceImpl implements IDemoService { @Override public String get(String name) { System.out.println("Service实现类中的Name:"+ name); return name; }}目录构造:
在创建好的DxhDispatcherServlet中重写init()方法,并在init方法中做初始化配置:
加载配置文件 springmvc.properties扫描干系的类——扫描表明初始化Bean工具(实现IOC容器,基于表明)实现依赖注入布局一个handleMapping处理器映射器,将配置好的url和method建立映射关系@Overridepublic void init(ServletConfig config) throws ServletException { //1. 加载配置文件 springmvc.properties String contextConfigLocation = config.getInitParameter("contextConfigLocation"); doLoadConfig(contextConfigLocation); //2. 扫描干系的类——扫描表明 doScan(""); //3. 初始化Bean工具(实现IOC容器,基于表明) doInstance(); //4. 实现依赖注入 doAutoWired(); //5. 布局一个handleMapping处理器映射器,将配置好的url和method建立映射关系 initHandleMapping(); System.out.println("MVC 初始化完成"); //6. 等待要求进入处理要求}
以及5个空方法,这篇文章自定义MVC框架实在便是须要对这5个步骤的编写。
//TODO 5,布局一个映射器private void initHandleMapping() {}//TODO 4,实现依赖注入private void doAutoWired() {}//TODO 3,IOC容器private void doInstance() {}//TODO 2,扫描类private void doScan(String scanPackage) {}//TODO 1,加载配置文件private void doLoadConfig(String contextConfigLocation) {}3.1 加载配置文件首先在resource目录中创建一个配置文件——springmvc.properties表示要扫描com.dxh.demo下的所有表明。然后在web.xml中进行配置:
这样,就可以通过config.getInitParameter("contextConfigLocation")得到这个路径。
在DxhDispatcherServlet中定义一个属性,我们把加载后的配置文件中的信息,存储在Properties 中
private Properties properties = new Properties();;
//1,加载配置文件private void doLoadConfig(String contextConfigLocation) { //根据指定路径加载成流: InputStream resourceAsStream = this.getClass().getClassLoader().getResourceAsStream(contextConfigLocation); try { properties.load(resourceAsStream); } catch (IOException e) { e.printStackTrace(); }}3.2 扫描干系的类,扫描表明上一步骤,我们已经把须要扫描的包存在Properties中,以是这里须要取出:
//2. 扫描干系的类——扫描表明doScan(properties.getProperty("scanPackage"));把扫描到的类型的全类名存在一个List中缓存起来,等待利用,在DxhDispatcherServlet中定义一个list:
//缓存扫描到的类的全类名private List<String> classNames = new ArrayList<>();从配置文件中我们得到了一个须要扫描的包名(com.dxh.demo),我们须要根据classPath+包名,来得到它实际上在磁盘上存的路径,然后递归,直到把所有的该包下(包括子包...)所有的类文件(.class结尾)。然后存在在List classNames中。
//2,扫描类//scanPackage :com.dxh.demo package--->磁盘的文件夹(File)private void doScan(String scanPackage) { //1.得到classPath路径 String clasPath = Thread.currentThread().getContextClassLoader().getResource("").getPath(); //2.拼接,得到scanPackage在磁盘上的路径 String scanPackagePath= clasPath + scanPackage.replaceAll("\\.","/"); File pack = new File(scanPackagePath); File[] files = pack.listFiles(); for (File file : files) { if (file.isDirectory()){ //子 package //递归 doScan(scanPackage+"."+file.getName()); //com.dxh.demo.controller }else if(file.getName().endsWith(".class")){ String className = scanPackage + "." + file.getName().replace(".class", ""); classNames.add(className); } }}3.3 初始化Bean工具(实现IOC容器,基于表明)
上一步骤我们把扫描到的类的全类名放到了,list中,那么本次步骤须要遍历全体list:
遍历List,依次得到所有的全类名通过反射得到类工具根据类工具判断有没有表明,并区分controller和servicecontroller,它的id此处不做过多处理,不取value了,用类的首字母小写作为id,保存到IOC容器中。service,service层每每是有接口的,再以接口名为id再存入一份bean到ioc,便于后期根据接口类型注入完成代码实现:
//IOC容器private Map<String,Object> ioc = new HashMap<>();
//3,IOC容器//基于classNames缓存的类的全限定类名,以及反射技能,完成工具创建和管理private void doInstance() { if (classNames.size()==0) return; try{ for (int i = 0; i < classNames.size(); i++) { String className = classNames.get(i); //com.dxh.demo.controller.DemoController //反射 Class<?> aClass = Class.forName(className); //区分controller ,区分service if (aClass.isAnnotationPresent(DxhController.class)){ //controller的id此处不做过多处理,不取value了,用类的首字母小写作为id,保存到IOC容器中 String simpleName = aClass.getSimpleName();//DemoController String lowerFirstSimpleName = lowerFirst(simpleName); //demoController Object bean = aClass.newInstance(); ioc.put(lowerFirstSimpleName,bean); }else if (aClass.isAnnotationPresent(DxhService.class)){ DxhService annotation = aClass.getAnnotation(DxhService.class); //获取表明的值 String beanName = annotation.value(); //指定了id就以指定的id为准 if (!"".equals(beanName.trim())){ ioc.put(beanName,aClass.newInstance()); }else{ //没有指定id ,首字母小写 String lowerFirstSimpleName = lowerFirst(aClass.getSimpleName()); ioc.put(lowerFirstSimpleName,aClass.newInstance()); } //service层每每是有接口的,再以接口名为id再存入一分bean到ioc,便于后期根据接口类型注入 Class<?>[] interfaces = aClass.getInterfaces(); for (Class<?> anInterface : interfaces) { //以接口的类名作为id放入。 ioc.put(anInterface.getName(),aClass.newInstance()); } }else { continue; } } }catch (Exception e){ e.printStackTrace(); }}3.4 实现依赖注入:
上一步骤把所有须要加载的bean,存入了ioc Map中,此时,我们就须要遍历这个map然后依次得到每个bean工具,然后判断工具中有没有被@DxhAutowired润色的属性。
遍历ioc这个map,得到每个工具获取工具的字段(属性)信息判断字段是否被@DxhAutowired润色判断@DxhAutowired有没有设置value值有,直接从ioc容器中取出,然后设置属性。无,须要根据当前字段的类型注入(接口注入)代码实现:
//4,实现依赖注入private void doAutoWired() { if (ioc.isEmpty()){return;} //1,判断容器中有没有被@DxhAutowried表明的属性,如果有须要掩护依赖注入关系 for (Map.Entry<String,Object> entry: ioc.entrySet()){ //获取bean工具中的字段信息 Field[] declaredFields = entry.getValue().getClass().getDeclaredFields(); for (Field declaredField : declaredFields) { if (!declaredField.isAnnotationPresent(DxhAutowired.class)){ continue; } //有该表明: DxhAutowired annotation = declaredField.getAnnotation(DxhAutowired.class); String beanName = annotation.value(); //须要注入的bean的Id if ("".equals(beanName.trim())){ //没有配置详细的beanId,须要根据当前字段的类型注入(接口注入) IDemoService beanName = declaredField.getType().getName(); } //开启赋值 declaredField.setAccessible(true); try { //字段调用,两个参数:(哪个工具的字段,传入什么) declaredField.set(entry.getValue(),ioc.get(beanName)); } catch (IllegalAccessException e) { e.printStackTrace(); } } }}3.5 布局一个handleMapping处理器映射器
布局一个handleMapping处理器映射器,将配置好的url和method建立映射关系。
手写MVC框架最关键的环节
假设有一个:
那么如何通过/demo/query定位到 DemoController类中的query这个方法 ?
之前我们所有被@DxhController(自定义Controller表明)的类,都存在了ioc 这个map中。我们可以遍历这个map,得到每个bean工具然后判断是否被@DxhController所润色(打消@DxhService所润色的bean)然后判断是否被@DxhRequestMapping所润色,有的话,就取其value值,作为baseUrl然后遍历该bean工具中的所有方法,得到被@DxhRequestMapping润色的方法。得到其value值,作为methodUrl。baseUrl + methodUrl = url我们把url和当前method绑定起来,存在map中,也便是建立了url和method建立映射关系。代码实现:
//handleMapping ,存储url和method直接的映射关系private Map<String,Object> handleMapping = new HashMap<>();
//5,布局一个映射器,将url和method进行关联private void initHandleMapping() { if (ioc.isEmpty()){return;} for (Map.Entry<String,Object> entry: ioc.entrySet()){ //获取ioc中当前遍历工具的class类型 Class<?> aClass = entry.getValue().getClass(); //打消非controller层的类 if (!aClass.isAnnotationPresent(DxhController.class)){ continue; } String baseUrl = ""; if (aClass.isAnnotationPresent(DxhRequestMapping.class)){ //Controller层 类上 表明@DxhRequestMapping中的value值 baseUrl = aClass.getAnnotation(DxhRequestMapping.class).value(); } //获取方法 Method[] methods = aClass.getMethods(); for (Method method : methods) { //打消没有@DxhRequestMapping表明的方法 if (!method.isAnnotationPresent(DxhRequestMapping.class)){continue;} //Controller层 类中方法上 表明@DxhRequestMapping中的value值 String methodUrl = method.getAnnotation(DxhRequestMapping.class).value(); String url = baseUrl+methodUrl; //建立url和method之间的映射关系,用map缓存起来 handleMapping.put(url,method); } }}4,测试一下:
到目前位置,还没有完备写完,但是不妨碍我们测试一下看看刚才写的那部分内容有没有什么问题:
完全的pom文件:<?xml version="1.0" encoding="UTF-8"?><project xmlns="http://maven.apache.org/POM/4.0.0" xmlns:xsi="http://www.w3.org/2001/XMLSchema-instance" xsi:schemaLocation="http://maven.apache.org/POM/4.0.0 http://maven.apache.org/xsd/maven-4.0.0.xsd"> <modelVersion>4.0.0</modelVersion> <groupId>com.dxh.edu</groupId> <artifactId>mvc</artifactId> <version>1.0-SNAPSHOT</version> <packaging>war</packaging> <name>mvc Maven Webapp</name> <url>http://www.example.com</url> <properties> <project.build.sourceEncoding>UTF-8</project.build.sourceEncoding> <maven.compiler.source>11</maven.compiler.source> <maven.compiler.target>11</maven.compiler.target> </properties> <dependencies> <dependency> <groupId>junit</groupId> <artifactId>junit</artifactId> <version>4.12</version> <scope>test</scope> </dependency> <dependency> <groupId>javax.servlet</groupId> <artifactId>servlet-api</artifactId> <version>2.5</version> <!-- 支配在做事器时,不该用这个servlet-api 而利用tomcat的--> <scope>provided</scope> </dependency> </dependencies> <build> <plugins> <plugins> <!-- 编译插件定义编译细节--> <plugin> <groupId>org.apache.maven.plugins</groupId> <artifactId>maven-compiler-plugin</artifactId> <version>3.2</version> <configuration> <source>11</source> <target>11</target> <encoding>utf-8</encoding> <!-- 见告编译器,编译的时候记录下形参的真实名称--> <compilerArgs> <arg>-parameters</arg> </compilerArgs> </configuration> </plugin> <plugin> <groupId>org.apache.tomcat.maven</groupId> <artifactId>tomcat7-maven-plugin</artifactId> <version>2.2</version> <configuration> <port>8080</port> <path>/</path> </configuration> </plugin> </plugins> </build></project>
pom文件中加入了一个tomcat插件,并设置端口为8080,因此我们通过tomcat启动项目:
启动完成后,打开浏览器url中输入:
http://localhost:8080/demo/query
浏览器中什么都没返回(我们的代码还没真正的完成,尚未编写处理要求步骤),同时掌握台中打印了MVC初始化完成,可以认为,目前的代码没有明显的毛病。 我们连续~~~~~
5,改造initHandleMapping()5.1 为什么改造?DxhDispatcherServlet这个类继续了HttpServlet,并重写了doGet和doPost方法,在doGet中调用了doPost方法,当我们利用反射调用方法时(method.invoke(......))创造少了一部分参数:
因此我们要改造initHandleMapping(),修正url和method的映射关系(不简大略单的存入map中)。
5.2 新建Handler类package com.dxh.edu.mvcframework.pojo;import java.lang.reflect.Method;import java.util.HashMap;import java.util.Map;import java.util.regex.Pattern;public class Handler { //method.invoke(obj,)须要 private Object controller; private Method method; //spring中url支持正则 private Pattern pattern; //参数的顺序,为了进行参数绑定 ,Key 参数名, Value 代表第几个参数 private Map<String,Integer> paramIndexMapping; public Handler(Object controller, Method method, Pattern pattern) { this.controller = controller; this.method = method; this.pattern = pattern; this.paramIndexMapping = new HashMap<>(); } //getset方法这里省略,实际代码中须要...}
在Handler类中编写了4个属性:
private Object controller:method.invoke(obj,)须要private Method method:与url绑定的方法private Pattern pattern:可以通过正则匹配,也可以直接写String url。private Map<String,Integer> paramIndexMapping:参数的顺序,为了进行参数绑定 ,Key 参数名, Value 代表第几个参数5.3 修正initHandleMapping()首先,就不能直接通过Map<url,Method>的得办法进行关系映射了,利用一个list,泛型是刚才创建的Handler。
//handleMapping ,存储url和method直接的映射关系// private Map<String,Method> handleMapping = new HashMap<>(); private List<Handler> handlerMapping = new ArrayList<>();
改动前,改动后代码比拟:
改动后的initHandleMapping():
//5,布局一个映射器,将url和method进行关联private void initHandleMapping() { if (ioc.isEmpty()){return;} for (Map.Entry<String,Object> entry: ioc.entrySet()){ //获取ioc中当前遍历工具的class类型 Class<?> aClass = entry.getValue().getClass(); //打消非controller层的类 if (!aClass.isAnnotationPresent(DxhController.class)){ continue; } String baseUrl = ""; if (aClass.isAnnotationPresent(DxhRequestMapping.class)){ //Controller层 类上 表明@DxhRequestMapping中的value值 baseUrl = aClass.getAnnotation(DxhRequestMapping.class).value(); } //获取方法 Method[] methods = aClass.getMethods(); for (Method method : methods) { //打消没有@DxhRequestMapping表明的方法 if (!method.isAnnotationPresent(DxhRequestMapping.class)){continue;} //Controller层 类中方法上 表明@DxhRequestMapping中的value值 String methodUrl = method.getAnnotation(DxhRequestMapping.class).value(); String url = baseUrl+methodUrl; //把method所有信息以及url封装为Handler Handler handler = new Handler(entry.getValue(),method, Pattern.compile(url)); //处理打算方法的参数位置信息 Parameter[] parameters = method.getParameters(); for (int i = 0; i < parameters.length; i++) { Parameter parameter = parameters[i]; //不做太多的参数类型判断,只做:HttpServletRequest request, HttpServletResponse response和基本类型参数 if (parameter.getType()==HttpServletRequest.class||parameter.getType()==HttpServletResponse.class){ //如果时request和response工具,那么参数名称存 HttpServletRequest 和 HttpServletResponse handler.getParamIndexMapping().put(parameter.getType().getSimpleName(),i); }else{ handler.getParamIndexMapping().put(parameter.getName(),i); } } handlerMapping.add(handler); } }}6, 要求处理开拓 doPost():
上一步骤,我们配置了 uri和method的映射关系,并封装到了Handler中存入list,那么接下来,就要通过HttpServletRequest,取出uri,然后找到详细的Handler:
通过HttpServletRequest取出uri找到详细的Handler得到将调用方法的参数的数组根据上述数组长度创建一个新的数组(参数数组,传入反射调用的)通过req.getParameterMap()得到前台传来的参数parameterMap遍历parameterMap通过StringUtils.join方法把name=1&name=2格式的参数变为name[1,2] (须要commons-lang依赖)参数匹配并设置private Handler getHandler(HttpServletRequest req) { if (handlerMapping.isEmpty()){return null;} String url = req.getRequestURI(); //遍历 handlerMapping for (Handler handler : handlerMapping) { Matcher matcher = handler.getPattern().matcher(url); if (!matcher.matches()){continue;} return handler; } return null;}
@Override protected void doPost(HttpServletRequest req, HttpServletResponse resp) throws IOException { //根据uri获取到能够处理当前要求的Handler(从handlerMapping中(list)) Handler handler = getHandler(req); if (handler==null){ resp.getWriter().write("404 not found"); return; } //参数绑定 //该方法所有参数得类型数组 Class<?>[] parameterTypes = handler.getMethod().getParameterTypes(); //根据上述数组长度创建一个新的数组(参数数组,传入反射调用的) Object[] paramValues = new Object[parameterTypes.length]; //以下便是为了向参数数组中设值,而且还得担保参数得顺序和方法中形参顺序同等。 Map<String,String[]> parameterMap = req.getParameterMap(); //遍历request中所有的参数 ,(添补除了request、response之外的参数) for (Map.Entry<String,String[]> entry: parameterMap.entrySet()){ //name=1&name=2 name[1,2] String value = StringUtils.join(entry.getValue(), ",");// 犹如 1,2 //如果参数和方法中的参数匹配上了,填充数据 if (!handler.getParamIndexMapping().containsKey(entry.getKey())){continue;} //方法形参确实有该参数,找到它得索引位置,对应得把参数值放入paramValues Integer index = handler.getParamIndexMapping().get(entry.getKey()); //把前台通报过来的参数值,添补到对应得位置去 paramValues[index] = value; } Integer requestIndex = handler.getParamIndexMapping().get(HttpServletRequest.class.getSimpleName()); paramValues[requestIndex] = req; Integer responseIndex = handler.getParamIndexMapping().get(HttpServletResponse.class.getSimpleName()); paramValues[responseIndex] = resp; //终极调用handler得method属性 try { Object invoke = handler.getMethod().invoke(handler.getController(), paramValues);//大略操作,把方法返回的数据以字符串的形式写出resp.getWriter().write(invoke.toString()); } catch (IllegalAccessException e) { e.printStackTrace(); } catch (InvocationTargetException e) { e.printStackTrace(); } }7,测试:
打开浏览器,url中输入:http://localhost:8080/demo/query?name=lisi
返回:
掌握台中打印出:
OK完成~