客户端macOS系统提交代码到===GitServe 10.211.55.3 /home/git/repos/app.git
关于这个的配置可以参考这里

Centos7下搭建大略的git做事器https://www.toutiao.com/i6882653528150508044/
开始构建项目
新建—输入项目名称php-deploy,选择构建自由风格的软件项目—下一步
Gernal配置,丢弃旧的构建,防止jenkins构建较多之后变臃肿
配置好源码管理之后可以直接先保存构建一次
下面这个能跑通的条件是用户已经打通Credentials
手动在Jenkins主机上切换到Jenkins用户,实行git命令拉取代码
sudo su -s /bin/bash jenkins
git clone git@10.211.55.3:/home/git/repos/app.git
我这里通过rpm安装的Jenkins 以是将
/var/lib/jenkins/.ssh/id_rsa.pub追加到/home/git/.ssh/authorized_keys里面
一样平常就OK了
关于凭据这里配置了Jenkins用户
关于凭据解释参考此图
只有上面条件OK之后,下面源码管理这里才不会出错
然后直接构建
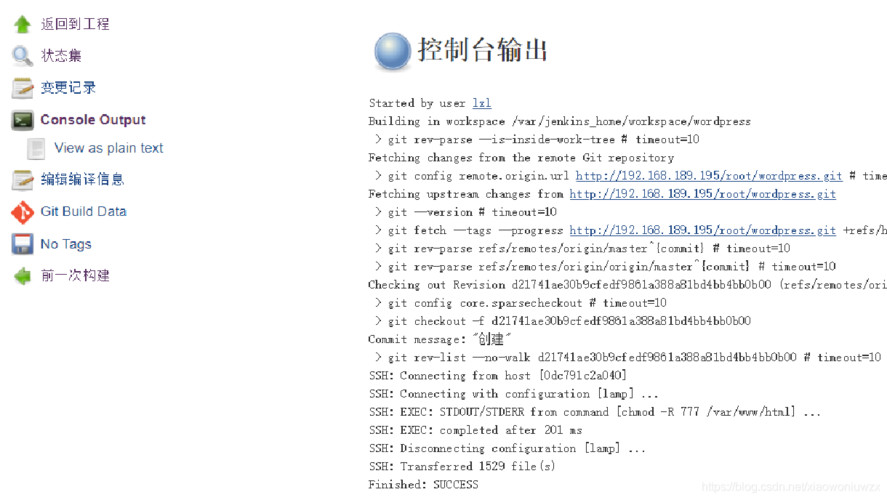
然后点击最左侧的图标:
查看掌握台输出:
Started by user adminRunning as SYSTEMBuilding in workspace /var/lib/jenkins/workspace/php-deployThe recommended git tool is: NONEusing credential 73d0c28a-8320-4393-86eb-2b60472899a1Cloning the remote Git repositoryCloning repository git@10.211.55.3:/home/git/repos/app.git > /usr/bin/git init /var/lib/jenkins/workspace/php-deploy # timeout=10Fetching upstream changes from git@10.211.55.3:/home/git/repos/app.git > /usr/bin/git --version # timeout=10 > git --version # 'git version 1.8.3.1'using GIT_SSH to set credentials > /usr/bin/git fetch --tags --progress git@10.211.55.3:/home/git/repos/app.git +refs/heads/:refs/remotes/origin/ # timeout=10 > /usr/bin/git config remote.origin.url git@10.211.55.3:/home/git/repos/app.git # timeout=10 > /usr/bin/git config --add remote.origin.fetch +refs/heads/:refs/remotes/origin/ # timeout=10Avoid second fetch > /usr/bin/git rev-parse refs/remotes/origin/master^{commit} # timeout=10Checking out Revision 8d2821c2b9e4ac77d758ba2ca6ad87bc9a7e709a (refs/remotes/origin/master) > /usr/bin/git config core.sparsecheckout # timeout=10 > /usr/bin/git checkout -f 8d2821c2b9e4ac77d758ba2ca6ad87bc9a7e709a # timeout=10Commit message: "add php file"First time build. Skipping changelog.[php-deploy] $ /bin/sh -xe /tmp/jenkins6495258260213274036.shFinished: SUCCESS到现在为止,解释数据的拉取是正常的。都可以到对应的目录里边来查看。
# pwd
/var/lib/jenkins/workspace/php-deploy
# ls
index2.html index3.html index.html phpinfo.php
下一步的操作便是将拉渠道的代码推送到对应的PHP做事器的对应目录/home/www
命令大略解释:由于这个是在root下实行的,以是须要配置root用户的免密上岸
将Jenkins 的root用户的id_rsa.pub放到
cat /root/.ssh/id_rsa.pub >> /home/www/.ssh/authorized_keys
源目录删除的文件,目标文件也要删除,加--delete参数 --delete delete extraneous files from destination dirs--progress show progress during transferrsync -raz --delete --progress www@10.211.55.3:/home/www配置中如下填写
再次构建,掌握台输出
Started by user adminRunning as SYSTEMBuilding in workspace /var/lib/jenkins/workspace/php-deployThe recommended git tool is: NONEusing credential 73d0c28a-8320-4393-86eb-2b60472899a1 > /usr/bin/git rev-parse --is-inside-work-tree # timeout=10Fetching changes from the remote Git repository > /usr/bin/git config remote.origin.url git@10.211.55.3:/home/git/repos/app.git # timeout=10Fetching upstream changes from git@10.211.55.3:/home/git/repos/app.git > /usr/bin/git --version # timeout=10 > git --version # 'git version 1.8.3.1'using GIT_SSH to set credentials > /usr/bin/git fetch --tags --progress git@10.211.55.3:/home/git/repos/app.git +refs/heads/:refs/remotes/origin/ # timeout=10 > /usr/bin/git rev-parse refs/remotes/origin/master^{commit} # timeout=10Checking out Revision 8d2821c2b9e4ac77d758ba2ca6ad87bc9a7e709a (refs/remotes/origin/master) > /usr/bin/git config core.sparsecheckout # timeout=10 > /usr/bin/git checkout -f 8d2821c2b9e4ac77d758ba2ca6ad87bc9a7e709a # timeout=10Commit message: "add php file" > /usr/bin/git rev-list --no-walk 8d2821c2b9e4ac77d758ba2ca6ad87bc9a7e709a # timeout=10[php-deploy] $ /bin/sh -xe /tmp/jenkins5178794915886016847.sh+ rsync -raz --delete --progress index2.html index3.html index.html phpinfo.php www@10.211.55.3:/home/www/ ___ ___ (o o) (o o) ( V ) ALex CentOS ( V )--m-m-----------------m-m--sending incremental file listFinished: SUCCESS登录到PHP做事器,可以看到文件已经存在了
$ pwd/home/www$ lsindex2.html index3.html index.html phpinfo.php