Motan 是一套高性能、易于利用的分布式远程做事调用(RPC)框架。
功能

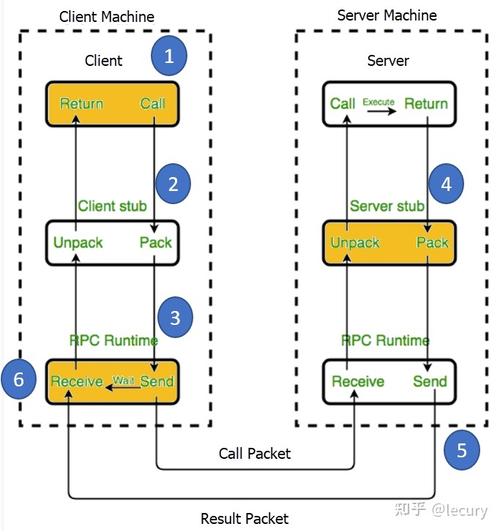
大略调用示例
同步调用
在pom中添加依赖<dependency> <groupId>com.weibo</groupId> <artifactId>motan-core</artifactId> <version>RELEASE</version> </dependency> <dependency> <groupId>com.weibo</groupId> <artifactId>motan-transport-netty</artifactId> <version>RELEASE</version> </dependency> <!-- only needed for spring-based features --> <dependency> <groupId>com.weibo</groupId> <artifactId>motan-springsupport</artifactId> <version>RELEASE</version> </dependency> <dependency> <groupId>org.springframework</groupId> <artifactId>spring-context</artifactId> <version>4.2.4.RELEASE</version> </dependency>为调用方和做事方创建公共接口。src/main/java/quickstart/FooService.java
package quickstart;public interface FooService { public String hello(String name);}编写业务接口逻辑、创建并启动RPC Server。src/main/java/quickstart/FooServiceImpl.java
package quickstart;public class FooServiceImpl implements FooService { public String hello(String name) { System.out.println(name + \"大众 invoked rpc service\"大众); return \"大众hello \公众 + name; }}src/main/resources/motan_server.xml
<?xml version=\"大众1.0\公众 encoding=\"大众UTF-8\"大众?><beans xmlns=\公众http://www.springframework.org/schema/beans\"大众xmlns:xsi=\"大众http://www.w3.org/2001/XMLSchema-instance\公众xmlns:motan=\"大众http://api.weibo.com/schema/motan\"大众xsi:schemaLocation=\公众http://www.springframework.org/schema/beans http://www.springframework.org/schema/beans/spring-beans-2.5.xsd http://api.weibo.com/schema/motan http://api.weibo.com/schema/motan.xsd\"大众> <!-- service implemention bean --> <bean id=\"大众serviceImpl\"大众 class=\"大众quickstart.FooServiceImpl\"大众 /> <!-- exporting service by Motan --> <motan:service interface=\公众quickstart.FooService\公众 ref=\"大众serviceImpl\"大众 export=\公众8002\公众 /></beans>`src/main/java/quickstart/Server.java`package quickstart;import org.springframework.context.ApplicationContext;import org.springframework.context.support.ClassPathXmlApplicationContext;public class Server { public static void main(String[] args) throws InterruptedException { ApplicationContext applicationContext = new ClassPathXmlApplicationContext(\"大众classpath:motan_server.xml\公众); System.out.println(\"大众server start...\"大众); }}实行Server类中的main函数将会启动Motan做事,并监听8002端口.创建并实行RPC Client。src/main/resources/motan_client.xml
<?xml version=\"大众1.0\公众 encoding=\"大众UTF-8\"大众?><beans xmlns=\公众http://www.springframework.org/schema/beans\"大众xmlns:xsi=\"大众http://www.w3.org/2001/XMLSchema-instance\"大众xmlns:motan=\"大众http://api.weibo.com/schema/motan\"大众xsi:schemaLocation=\"大众http://www.springframework.org/schema/beans http://www.springframework.org/schema/beans/spring-beans-2.5.xsd http://api.weibo.com/schema/motan http://api.weibo.com/schema/motan.xsd\公众> <!-- reference to the remote service --> <motan:referer id=\"大众remoteService\"大众 interface=\"大众quickstart.FooService\"大众 directUrl=\公众localhost:8002\"大众/></beans>src/main/java/quickstart/Client.java
package quickstart;import org.springframework.context.ApplicationContext;import org.springframework.context.support.ClassPathXmlApplicationContext;public class Client { public static void main(String[] args) throws InterruptedException { ApplicationContext ctx = new ClassPathXmlApplicationContext(\公众classpath:motan_client.xml\公众); FooService service = (FooService) ctx.getBean(\公众remoteService\"大众); System.out.println(service.hello(\公众motan\公众)); }}实行Client类中的main函数将实行一次远程调用,并输出结果。
异步调用
异步调用与同步调用基本配置完备一样,只须要在接口类中加上@MotanAsync表明,然后client端稍作修正。server端不须要做任何修正。详细步骤如下:
在接口类上加@MotanAsync表明package quickstart;@MotanAsyncpublic interface FooService { public String hello(String name);}编译时,Motan自动天生异步service类,天生路径为target/generated-sources/annotations/,天生的类名为service名加上Async,例如service类名为FooService.java,则自动天生的类名为FooServiceAsync.java。 其余,须要将motan自动生产类文件的路径配置为项目source path,可以利用maven plugin或手动配置。pom.xml配置如下:
<plugin> <groupId>org.codehaus.mojo</groupId> <artifactId>build-helper-maven-plugin</artifactId> <version>RELEASE</version> <executions> <execution> <phase>generate-sources</phase> <goals> <goal>add-source</goal> </goals> <configuration> <sources> <source>${project.build.directory}/generated-sources/annotations</source> </sources> </configuration> </execution> </executions></plugin>在client端配置motan_client.xml时,在同步调用配置的根本上,只须要修正referer的interface为Motan自动天生的接口类即可。
<motan:referer id=\"大众remoteService\"大众 interface=\"大众quickstart.FooServiceAsync\公众 directUrl=\"大众localhost:8002\"大众/>异步利用办法如下:
public static void main(String[] args) { ApplicationContext ctx = new ClassPathXmlApplicationContext(new String[] {\公众classpath:motan_client.xml\"大众}); FooServiceAsync service = (FooServiceAsync) ctx.getBean(\"大众remoteService\"大众); // sync call System.out.println(service.hello(\"大众motan\"大众)); // async call ResponseFuture future = service.helloAsync(\公众motan async \"大众); System.out.println(future.getValue()); // multi call ResponseFuture future1 = service.helloAsync(\"大众motan async multi-1\"大众); ResponseFuture future2 = service.helloAsync(\"大众motan async multi-2\"大众); System.out.println(future1.getValue() + \"大众, \公众 + future2.getValue()); // async with listener FutureListener listener = new FutureListener() { @Override public void operationComplete(Future future) throws Exception { System.out.println(\"大众async call \"大众 + (future.isSuccess() ? \"大众sucess! value:\"大众 + future.getValue() : \"大众fail! exception:\"大众 + future.getException().getMessage())); } }; ResponseFuture future3 = service.helloAsync(\"大众motan async multi-1\"大众); ResponseFuture future4 = service.helloAsync(\"大众motan async multi-2\"大众); future3.addListener(listener); future4.addListener(listener);}
详细代码可以参考demo模块
集群调用示例
在集议论况下利用Motan须要依赖外部做事创造组件,目前支持consul或zookeeper。
利用Consul作为注册中央
Consul安装与启动
安装(官方文档)
# 这里以linux为例wget https://releases.hashicorp.com/consul/0.6.4/consul_0.6.4_linux_amd64.zipunzip consul_0.6.4_linux_amd64.zipsudo mv consul /bin
启动(官方文档)
测试环境启动:consul agent -dev
ui后台 http://localhost:8500/ui
Motan-Consul配置
在server和client中添加motan-registry-consul依赖<dependency> <groupId>com.weibo</groupId> <artifactId>motan-registry-consul</artifactId> <version>RELEASE</version></dependency>在server和client的配置文件等分别增加consul registry定义。
<motan:registry regProtocol=\"大众consul\"大众 name=\公众my_consul\公众 address=\公众127.0.0.1:8500\"大众/>在Motan client及server配置改为通过registry做事创造。client
<motan:referer id=\"大众remoteService\"大众 interface=\公众quickstart.FooService\公众 registry=\公众my_consul\公众/>server
<motan:service interface=\"大众quickstart.FooService\"大众 ref=\"大众serviceImpl\"大众 registry=\"大众my_consul\"大众 export=\"大众8002\"大众 />server程序启动后,须要显式调用心跳开关,注册到consul。
MotanSwitcherUtil.setSwitcherValue(MotanConstants.REGISTRY_HEARTBEAT_SWITCHER, true)进入ui后台查看做事是否正常供应调用启动client,调用做事
利用ZooKeeper作为注册中央
ZooKeeper安装与启动(官方文档)
单机版安装与启动
wget http://mirrors.cnnic.cn/apache/zookeeper/zookeeper-3.4.8/zookeeper-3.4.8.tar.gztar zxvf zookeeper-3.4.8.tar.gzcd zookeeper-3.4.8/conf/cp zoo_sample.cfg zoo.cfgcd ../sh bin/zkServer.sh start
Motan-ZooKeeper配置
在server和client中添加motan-registry-zookeeper依赖<dependency> <groupId>com.weibo</groupId> <artifactId>motan-registry-zookeeper</artifactId> <version>RELEASE</version></dependency>在server和client的配置文件等分别增加zookeeper registry定义。zookeeper为单节点
<motan:registry regProtocol=\公众zookeeper\"大众 name=\"大众my_zookeeper\"大众 address=\"大众127.0.0.1:2181\公众/>zookeeper多节点集群
<motan:registry regProtocol=\公众zookeeper\"大众 name=\"大众my_zookeeper\"大众 address=\"大众127.0.0.1:2181,127.0.0.1:2182,127.0.0.1:2183\"大众/>在Motan client及server配置改为通过registry做事创造。client
<motan:referer id=\公众remoteService\"大众 interface=\"大众quickstart.FooService\"大众 registry=\公众my_zookeeper\"大众/>server
<motan:service interface=\公众quickstart.FooService\"大众 ref=\"大众serviceImpl\"大众 registry=\"大众my_zookeeper\"大众 export=\公众8002\"大众 />server程序启动后,须要显式调用心跳开关,注册到zookeeper。
MotanSwitcherUtil.setSwitcherValue(MotanConstants.REGISTRY_HEARTBEAT_SWITCHER, true)启动client,调用做事
其他调用示例
供应YAR协议做事
YAR协议是php的一个rpc扩展,motan框架可以供应yar协议的RPC做事 1、引入motan-protocol-yar.jar
<dependency> <groupId>com.weibo</groupId> <artifactId>motan-protocol-yar</artifactId> <version>RELEASE</version> </dependency>
2、在做事接口类上增加表明@YarConfig,声明做事的uri
@YarConfig(path = \公众/openapi/yarserver/test\"大众) public interface YarService { public String hello(String name); }
3、配置protocol的name=\"大众yar\"大众
<motan:protocol id=\公众demoYar\公众 name=\"大众yar\"大众 .../>
4、配置service的export,利用yar协议供应做事
<motan:service interface=\公众com.weibo.motan.demo.service.YarService\公众 export=\"大众demoYar:8003\"大众 .../>
详细配置见motan-demo模块 YAR协议利用yar-java进行解析,java作为YAR client时可以直策应用
利用表明办法配置motan
server端配置
1、声明Annotation用来指定须要解析的包名
@Bean public AnnotationBean motanAnnotationBean() { AnnotationBean motanAnnotationBean = new AnnotationBean(); motanAnnotationBean.setPackage(\"大众com.weibo.motan.demo.server\"大众); return motanAnnotationBean; }
2、配置ProtocolConfig、RegistryConfig、BasicServiceConfig的bean工具,功能与xml配置中的protocol、registry、basicService标签同等。
@Bean(name = \"大众demoMotan\"大众) public ProtocolConfigBean protocolConfig1() { ProtocolConfigBean config = new ProtocolConfigBean(); config.setDefault(true); config.setName(\"大众motan\"大众); config.setMaxContentLength(1048576); return config; } @Bean(name = \公众registryConfig1\公众) public RegistryConfigBean registryConfig() { RegistryConfigBean config = new RegistryConfigBean(); config.setRegProtocol(\"大众local\"大众); return config; } @Bean public BasicServiceConfigBean baseServiceConfig() { BasicServiceConfigBean config = new BasicServiceConfigBean(); config.setExport(\公众demoMotan:8002\"大众); config.setGroup(\"大众testgroup\公众); config.setAccessLog(false); config.setShareChannel(true); config.setModule(\"大众motan-demo-rpc\公众); config.setApplication(\"大众myMotanDemo\公众); config.setRegistry(\"大众registryConfig1\"大众); return config; }
3、service的实现类上添加@MotanService表明,表明的配置参数与xml配置办法的service标签同等。
@MotanService(export = \"大众demoMotan:8002\"大众) public class MotanDemoServiceImpl implements MotanDemoService { public String hello(String name) { System.out.println(name); return \"大众Hello \"大众 + name + \"大众!\"大众; } }
4、利用spring-boot启动做事
@EnableAutoConfiguration @SpringBootApplication public class SpringBootRpcServerDemo { public static void main(String[] args) { System.setProperty(\"大众server.port\"大众, \"大众8081\公众); ConfigurableApplicationContext context = SpringApplication.run(SpringBootRpcServerDemo.class, args); MotanSwitcherUtil.setSwitcherValue(MotanConstants.REGISTRY_HEARTBEAT_SWITCHER, true); System.out.println(\公众server start...\"大众); } }
server端详细配置请参考motan-demo模块
client端配置
1、声明Annotation、protocolConfig、RegistryConfig的配置bean。办法与server端配置类似。
2、配置basicRefererConfig bean
@Bean(name = \"大众motantestClientBasicConfig\公众) public BasicRefererConfigBean baseRefererConfig() { BasicRefererConfigBean config = new BasicRefererConfigBean(); config.setProtocol(\"大众demoMotan\公众); config.setGroup(\公众motan-demo-rpc\"大众); config.setModule(\公众motan-demo-rpc\"大众); config.setApplication(\公众myMotanDemo\"大众); config.setRegistry(\"大众registry\"大众); config.setCheck(false); config.setAccessLog(true); config.setRetries(2); config.setThrowException(true); return config; }
3、在利用motan service 的工具上添加@MotanReferer表明,注册配置与xml办法的referer标签同等
@RestController public class HelloController { @MotanReferer(basicReferer = \公众motantestClientBasicConfig\公众, group = \"大众testgroup\"大众, directUrl = \"大众127.0.0.1:8002\"大众) MotanDemoService service; @RequestMapping(\公众/\"大众) @ResponseBody public String home() { String result = service.hello(\"大众test\公众); return result; } }
4、利用spring-boot启动client
@EnableAutoConfiguration @SpringBootApplication public class SpringBootRpcClientDemo { public static void main(String[] args) { SpringApplication.run(SpringBootRpcClientDemo.class, args); } }
client端详细配置请参考motan-demo模块
利用restful协议
功能支持
支持rpc单独进程和支配到servlet容器中完备支持原有做事管理功能支持rpc request/response的attachment机制完备支持rpc filter机制rest做事编程完备按照JAX-RS代码办法编写前置条件
引入motan-protocol-restful包
<dependency> <groupId>com.weibo</groupId> <artifactId>motan-protocol-restful</artifactId> <version>RELEASE</version> </dependency>
接口声明与实现
做事接口
@Path(\"大众/rest\公众) public interface RestfulService { @GET @Produces(MediaType.APPLICATION_JSON) List<User> getUsers(@QueryParam(\"大众uid\"大众) int uid); @GET @Path(\"大众/primitive\"大众) @Produces(MediaType.TEXT_PLAIN) String testPrimitiveType(); @POST @Consumes(MediaType.APPLICATION_FORM_URLENCODED) @Produces(MediaType.APPLICATION_JSON) Response add(@FormParam(\"大众id\"大众) int id, @FormParam(\"大众name\"大众) String name); @GET @Path(\公众/exception\"大众) @Produces(MediaType.APPLICATION_JSON) void testException(); }
做事实现
public class RestfulServerDemo implements RestfulService { @Override public List<User> getUsers(@CookieParam(\"大众uid\"大众) int uid) { return Arrays.asList(new User(uid, \"大众name\"大众 + uid)); } @Override public String testPrimitiveType() { return \"大众helloworld!\公众; } @Override public Response add(@FormParam(\"大众id\"大众) int id, @FormParam(\"大众name\"大众) String name) { return Response.ok().cookie(new NewCookie(\公众ck\"大众, String.valueOf(id))).entity(new User(id, name)).build(); } @Override public void testException() { throw new UnsupportedOperationException(\"大众unsupport\公众); } }
配置restserver
独立rpc进程办法
server端配置:
<bean id=\公众motanDemoServiceImpl\"大众 class=\"大众com.weibo.motan.demo.server.RestfulServerDemo\"大众/> <motan:registry regProtocol=\公众local\"大众 name=\"大众registry\"大众 /> <motan:protocol id=\公众demoRest\"大众 name=\"大众restful\"大众 endpointFactory=\"大众netty\"大众/> <motan:basicService export=\公众demoRest:8004\"大众 group=\"大众motan-demo-rpc\"大众 module=\"大众motan-demo-rpc\"大众 application=\公众myMotanDemo\公众 registry=\"大众registry\"大众 id=\"大众serviceBasicConfig\"大众/> <motan:service interface=\公众com.weibo.motan.demo.service.RestfulService\"大众 ref=\"大众motanDemoServiceImpl\公众 basicService=\"大众serviceBasicConfig\公众/>
client端配置:
<motan:registry regProtocol=\"大众direct\公众 name=\"大众registry\"大众 address=\公众127.0.0.1:8004\"大众/> <!-- restful 协议 --> <motan:protocol id=\"大众restfulProtocol\"大众 name=\"大众restful\公众 endpointFactory=\"大众netty\"大众/> <!-- 通用referer根本配置 --> <motan:basicReferer requestTimeout=\"大众1000\"大众 group=\公众motan-demo-rpc\"大众 module=\"大众motan-demo-rpc\"大众 application=\"大众myMotanDemo\"大众 protocol=\"大众restfulProtocol\公众 registry=\公众registry\公众 id=\公众motanTestClientBasicConfig\"大众 /> <!-- 利用 restful 协议--> <motan:referer id=\"大众restfulReferer\"大众 interface=\"大众com.weibo.motan.demo.service.RestfulService\"大众 basicReferer=\"大众motanTestClientBasicConfig\"大众/>
集成到java运用做事器中(如支配到tomcat中)
此时须要把稳contextpath问题
<motan:protocol name=\"大众restful\公众 endpointFactory=\"大众servlet\公众 />
做事端还需配置web.xml如下:
<!-- 此filter必须在spring ContextLoaderFilter之前 --> <listener> <listener-class>com.weibo.api.motan.protocol.restful.support.servlet.RestfulServletContainerListener</listener-class> </listener> <servlet> <servlet-name>dispatcher</servlet-name> <servlet-class>org.jboss.resteasy.plugins.server.servlet.HttpServletDispatcher</servlet-class> <load-on-startup>1</load-on-startup> <init-param> <param-name>resteasy.servlet.mapping.prefix</param-name> <param-value>/servlet</param-value> <!-- 此处实际为servlet-mapping的url-pattern,详细配置见resteasy文档--> </init-param> </servlet> <servlet-mapping> <servlet-name>dispatcher</servlet-name> <url-pattern>/servlet/</url-pattern> </servlet-mapping>
集成到java运用做事器的办法(servlet办法)适宜不同措辞直接http调用,须要把稳url中contextpath的问题。推举利用rpc进程办法
java作为client端调用时,推举server端同时导出restful和motan两种协议,java利用motan协议进行调用,其他措辞利用标准http协议调用。
详细请参考motan-demo模块中的RestfulServerDemo、RestfulClient
利用OpenTracing
Motan通过filter的SPI扩展机制支持OpenTracing,可以支持任何实现了OpenTracing标准的trace实现。利用OpenTracing须要以下步骤。
1、引入filter-opentracing扩展
<dependency> <groupId>com.weibo</groupId> <artifactId>filter-opentracing</artifactId> <version>RELEASE</version> </dependency>
2、如果第三方trace工具声明了io.opentracing.Tracer的SPI扩展,直接引入第三方trace的jar包即可。如果第三方没有声明,则转第三步。
3、自定义一个TracerFactory实现TracerFactory接口,通过getTracer()来获取不同tracer实现。设置OpenTracingContext的tracerFactory为自定义的TracerFactory即可。
可参考filter-opentracing模块src/test/java/com.weibo.api.motan.filter.opentracing.zipkin.demo包下的server端和client端实现。
优雅的停滞做事
Motan支持在Consul、ZooKeeper集议论况下优雅的关闭节点,当须要关闭或重启节点时,可以先将待上线节点从集群中摘除,避免直接关闭影响正常要求。
待关闭节点须要调用以下代码,建议通过servlet或业务的管理模块进行该调用。
MotanSwitcherUtil.setSwitcherValue(MotanConstants.REGISTRY_HEARTBEAT_SWITCHER, false)
管理后台
管理后台紧张包括RPC做事查询、流量切换、Motan指令设置等功能,需利用ZooKeeper作为注册中央
管理后台独立于Motan其他部分,可单独支配
管理后台安装
配置修正配置文件application.properties,配置注册中央类型(zookeeper, consul)及注册中央地址,默认不该用数据库默认的登任命户及权限如下:管理员:用户名admin 密码admin 访客:用户名guest 密码guest若需利用历史操作查询功能,则需配置数据库:数据库表构造位于motan-manager.sql,可直接导入数据库配置地址位于application.properties修正 MotanManagerApp 表明 @ImportResource(locations = {\"大众classpath:spring-security.xml\"大众})为 +@ImportResource(locations = {\公众classpath:spring-mybatis.xml\"大众, \"大众classpath:spring-security.xml\公众})启动在 motan/motan-manager/ 下实行 mvn package, 然后 java -jar target/motan-manager.jar 。
管理后台利用
RPC做事查询
查询指定group的所有service状态,包括正常供应做事的Server和正在调用的Client
注:Consul注册中央暂不支持Client查询
步骤:
在导航栏选择RPC做事查询,进入RPC做事查询页面下拉列表中选择要查询的做事所在的分组,如motan-demo-rpc,点击查询按钮流量切换(须要管理员权限)
对指定做事根据分组或ip地址进行动态流量调度
步骤:
以下示例演示将来自motan-demo-rpc分组中所有做事的流量切换到motan-demo-rpc2分组中
在导航栏选择流量切换,进入流量切换页面Step1:来源流量的RPC分组列表中选择须要切换流量的Service所在的分组,如motan-demo-rpc做事列表中表示所有做事,也可输入做事名称,语法见做事名语法,点击NextStep2:目标流量的RPC分组列表中选择目标流量分组,如motan-demo-rpc2,流量权重分配中根据须要按比例分配(可选范围是[0,100]),这里输入0和1,表示将来自motan-demo-rpc的流量全部转入motan-demo-rpc2,点击NextStep3:(可选)若需根据详细IP调度流量,可在此配置RPC Client中输入来源流量的ip,RPC Server中输入目标流量的ip,点击添加后将在路由规则结果中显示也可在路由规则结果中手动输入路由规则,路由规则见路由规则语法,点击NextStep4:指令预览功能暂未启用,点击Finish完成流量切换操作做事名语法
类名支持[a-zA-Z0-9_$.]运算符支持 () ! & |,优先级由高到低繁芜示例如下(com.weibo.User & !com.weibo.UserMapping) | com.weibo.Status# 匹配com.weibo下以User开头的不包括UserMapping的所有做事,或以Status开头的所有做事
路由规则语法
必须包含to关键字,to旁边两边分别为rpc client和rpc server的ip表达式,示例如下to 10.75.1.10.75.2. to 10.73.1. to !10.75.1.1
指令管理
对注册中央下的所有指令信息进行增编削查操作
步骤:
在导航栏选择指令查询,进入指令查询页面指令修正和删除操作须要管理员权限操作记录查询(须要管理员权限)
查询指令增编削查记录
步骤:
在导航栏选择操作记录查询,进入操作记录查询