在本文中,我将向你展示如何对你的用户履行联合的API与CLI访问。本帖中供应的举例利用了AWS Python SDK工具和一些附加的客户端侧的集成代码。如果你有用户须要这种访问掌握,履行该方案可以使你对这些用户的管理轻松自若。
让我们从快速地理解我们的目标开始。

从上面的输出结果中我们清楚地看到了什么?
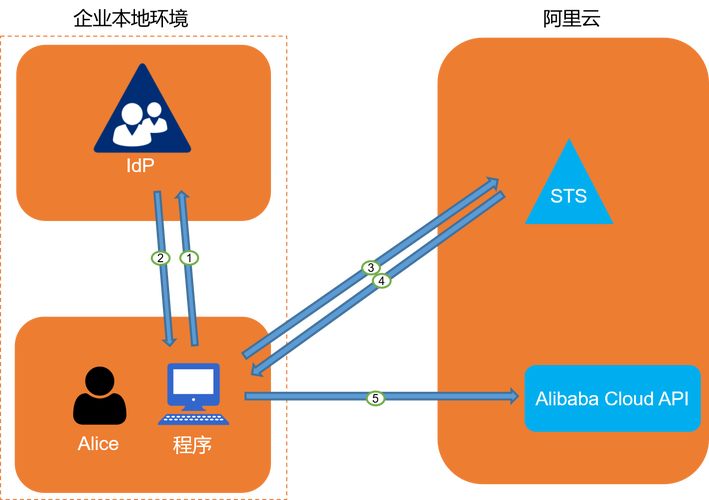
1. 系统提示联合用户输入Active Directory(动态目录)证书。这些证书用来与配置的IdP进行比较以对用户进行验证和授权。
2. 系统检讨返回的SAML断言,确定用户被授权承担的IAM(身份及访问管理)角色。用户选择了她期望的角色后,系统利用AWS STS(安全令牌做事)提取临时的安全证书。
3. 系统自动地将这些证书写入她本地的AWS证书文件,她可以开始发出AWS API或CLI调用指令。
4. 得到该样例,为你的组织对样例进行定制后,你就可以在保持AWS IAM做事供应的掌握的同时,利用组织的证书来提高你的AWS API和CLI界面的能力和自动化程度。
本帖将汇合中讲述如何利用微软动态目录联合做事(AD FS)。但是如果你正在利用其他供应商的同类产品,请不要感到失落望由于基本的组件该当可以与其他常见的IdP合营运转的。
为了能够紧跟本帖的讲述,你必须已经:
入门
1. 利用你的组织证书将AD FS精确地与你的AWS账户进行了集成,以便能够访问掌握台。如果你须要设置解释,请参考Enabling Federation to AWS using Windows Active Directory, ADFS, and SAML 2.0。
2. 已在本地事情站安装了新版本(2.36或更新)的AWS Python SDK工具。
3. 获取了最小限度的AWS证书文件(例如:~/.aws/credentials),并将文件中的如下内容调度到你首选的区域和输出格式。
主要提示:AWS访问密钥对并没有在上面的构造中配置由于最初的AWS STS调用是由值得信赖的IdP返回的SAML断言进行验证的。所有后续的API/CLI调用都是由包含在AWS STS令牌中的密钥对进行验证的。想要获取更多信息,请参考Giving AWS Console Access to Federated Users Using SAML
首先,你须要安装不属于Python核心发行版的两个模块,详细说,便是beautifulsoup4和requests-ntlm。有多少种方法可以安装着两个模块,但是包含在Python 2.7.9或更新版本中的pip工具,使模块安装变得很随意马虎。你只需运行如下两个命令即可:
[default]output = jsonregion = us-west-2aws_access_key_id =aws_secret_access_key =
首先运行下面的命令:
<u>pip install beautifulsoup4</u>
然后运行下面的命令:
pip install requests-ntlm
你该当会得到一些与如下截图类似的输出结果:
AWS联合过程利用IdP发起的登录方法。在末了的准备步骤中,你须要确定详细的被用来引发登录的URL。以基本的IdP引发登录的URL为出发点(该URL便是你用来联合访问SAML依赖各方的URL,SAML依赖各方包括AWS管理掌握台)。在本例中,我利用的是AD FS 2.0。在该版本中,URL的格式为ofhttps://<fqdn>/adfs/ls/IdpInitiatedSignOn.aspx。如果我将该URL输入浏览器的地址栏,我将会看到一个网站选择页面,如下图所示:
为告终构你所需的URL,将原来的IdP引发登录URL与查询字符串?loginToRp=urn:amazon:webservices连接。布局好的URL应呈现的形式是ofhttps://<fqdn>/adfs/ls/IdpInitiatedSignOn.aspx?loginToRp=urn:amazon:webservices。保存该URL由于在后面的阐述中它将被称为idpentryurl变量。如果你将这个串联的URL输出浏览器的地址栏,你该当仍旧可以实现AD FS IdP引发登录过程。但是,你绕过了网站选择页面,在验证完演习训练所需的URL后直接进入AWS管理掌握台。如果感兴趣的话,你可以访问Microsoft’s website去查看关于查询字符串的文档。
主要提示:务必密切把稳URL中主机名称的大写。AD FS在验证过程中会利用主机名称,任何在大小写方面的不匹配都会导致验证失落败。
检讨代码
既然你已经浏览了上面“入门”部分的步骤,你可以开始组合掌握联合API与CLI访问的集成代码了。我将会详细地阐明这一过程以便你可以跟随我的节奏。首先,让我们进行一些基本的导入和变量设置。
#!/usr/bin/python import sys import boto.sts import boto.s3 import requests import getpass import ConfigParser import base64 import xml.etree.ElementTree as ET from bs4 import BeautifulSoup from os.path import expanduser from urlparse import urlparse, urlunparse from requests_ntlm import HttpNtlmAuth ########################################################################### Variables # region: The default AWS region that this script will connect # to for all API calls region = 'us-west-2' # output format: The AWS CLI output format that will be configured in the # saml profile (affects subsequent CLI calls) outputformat = 'json' # awsconfigfile: The file where this script will store the temp # credentials under the saml profile awsconfigfile = '/.aws/credentials' # SSL certificate verification: Whether or not strict certificate # verification is done, False should only be used for dev/test sslverification = True # idpentryurl: The initial URL that starts the authentication process. idpentryurl = 'https://<fqdn>/adfs/ls/IdpInitiatedSignOn.aspx?loginToRp=urn:amazon:webservices' ##########################################################################
将上述代码中的变量调度为针对你的详细的区域(如us-west-2,us-east-1等等)和格式喜好(例如json,文本,或表格),然后插入本帖中上一部分变量idpentryurl的值。
基本环境搭建起来后,提示用户,从标准输入中检索用户的证书。在本帖的后面我将会谈论我们是如何支持其他的证书形式的。
# Get the federated credentials from the userprint \公众Username:\"大众,username = raw_inputpassword = getpass.getpassprint ''
位于第一行打印语句“Username”后面的逗号可能看起来像是一个毛病,实际上它是Python为了防止第一行打印语句添加换行符而利用的小技巧。你也将会把稳到getpass这一方法的利用,这一方法是为了防止密码被显示在输出结果中。
下一步,我们利用Python要求模块组合验证信息,用公式表示向IdP发送的HTTPS要求,正如下面的片段所示。假设验证成功,AD FS返回的相应会包含SAML断言。
# Initiate session handler session = requests.Session # Programatically get the SAML assertion # Set up the NTLM authentication handler by using the provided credential session.auth = HttpNtlmAuth(username, password, session) # Opens the initial AD FS URL and follows all of the HTTP302 redirects response = session.get(idpentryurl, verify=sslverification) # Debug the response if needed #print (response.text)
截止到目前,IdP相应已经安全得手了。以是,然让我们覆盖和废弃我们原来用来存储用户名和密码的变量,由于我们不再须要它们了。作为一种更高等别的措辞,Python并不像C措辞那样可以供应直接的内存操作来覆盖这些变量。但是Python的这个特点可以确担保书不到处游荡(到处被验证)。
# Overwrite and delete the credential variables, just for safety username = '##############################################' password = '##############################################' del username del password
正如我前面提到的,我们须要的SAML断言可以在IdP的相应中找到。下面的代码利用BeautifulSoup模块来提取SAML断言。
# Decode the response and extract the SAML assertion soup = BeautifulSoup(response.text.decode('utf8')) assertion = '' # Look for the SAMLResponse attribute of the input tag (determined by # analyzing the debug print lines above) for inputtag in soup.find_all('input'): if(inputtag.get('name') == 'SAMLResponse'): #print(inputtag.get('value')) assertion = inputtag.get('value')
这个片段只是循环访问所有的HTML输入标签直到它找到名称为SAMLResponse的标签。我们所探求的Base64编码的断言包含在该标签的取值属性中。在连续下一步前,我们须要深入一层处理SAML验证相应,提取该用户被授权的角色列表。该列表存储在SAML属性namedhttps://aws.amazon.com/SAML/Attributes/Role中,正如下面的代码所示。
# Parse the returned assertion and extract the authorized roles awsroles = root = ET.fromstring(base64.b64decode(assertion)) for saml2attribute in root.iter('{urn:oasis:names:tc:SAML:2.0:assertion}Attribute'): if (saml2attribute.get('Name') == 'https://aws.amazon.com/SAML/Attributes/Role'): for saml2attributevalue in saml2attribute.iter('{urn:oasis:names:tc:SAML:2.0:assertion}AttributeValue'): awsroles.append(saml2attributevalue.text) # Note the format of the attribute value should be role_arn,principal_arn # but lots of blogs list it as principal_arn,role_arn so let's reverse # them if needed for awsrole in awsroles: chunks = awsrole.split(',') if'saml-provider' in chunks[0]: newawsrole = chunks[1] + ',' + chunks[0] index = awsroles.index(awsrole) awsroles.insert(index, newawsrole) awsroles.remove(awsrole)
在上面的第一个环中,我在利用Pythonxml.etree.ElementTree模块解析SAML断言。只管断言看起来不是特殊地整洁,但是明确的名字空间和名称使我们的探求变得相对大略。
在第二个环中,代码只是在做一些主动的缺点预防,以确保角色中包含的ARN(亚马逊资源名称)排序精确。
现在我们知道了用户被授权承担的角色。下一步,代码讯问用户他们想要利用的角色。
# If I have more than one role, ask the user which one they want, # otherwise just proceed print \公众\"大众 if len(awsroles) > 1: i = 0 print \"大众Please choose the role you would like to assume:\"大众 for awsrole in awsroles: print '[', i, ']: ', awsrole.split(',')[0] i += 1 print \"大众Selection: \"大众, selectedroleindex = raw_input # Basic sanity check of input if int(selectedroleindex) > (len(awsroles) - 1): print 'You selected an invalid role index, please try again' sys.exit(0) role_arn = awsroles[int(selectedroleindex)].split(',')[0] principal_arn = awsroles[int(selectedroleindex)].split(',')[1] else: role_arn = awsroles[0].split(',')[0] principal_arn = awsroles[0].split(',')[1]
如果用户只要一个角色,该角色会自动被利用。否则,系统会提示用户从一个大略的列举列表中选择他们想要利用的角色。
现在,事情变得非常大略。由于我们已经检索了SAML断言,提取了各种ARN。我们只须要调用标准的AWS STS做事来要求AWS临时安全证书。这真的是全体过程的关键。我们已经做了所有的努力直到现在为下面大略的AssumeRolewithSAML API调用准备各种参数。
# Use the assertion to get an AWS STS token using Assume Role with SAML conn = boto.sts.connect_to_region(region) token = conn.assume_role_with_saml(role_arn, principal_arn, assertion)
主要提示:SAML断言来自于已配置的值得信赖的IdP,它的浸染便是为这次API调用充当验证证书。
现在我们已经从AWS STS得到了证书,下一步便是将这些证书插入AWS证书文件中的一个特定的文件,正如下面的片段所示。通过这一步,你将能够利用临时安全证书来进行任意次数的API或CLI调用,直到证书过期。
# Write the AWS STS token into the AWS credential file home = expanduser(\"大众~\"大众) filename = home + awsconfigfile # Read in the existing config file config = ConfigParser.RawConfigParser config.read(filename) # Put the credentials into a specific profile instead of clobbering # the default credentials if not config.has_section('saml'): config.add_section('saml') config.set('saml', 'output', outputformat) config.set('saml', 'region', region) config.set('saml', 'aws_access_key_id', token.credentials.access_key) config.set('saml', 'aws_secret_access_key', token.credentials.secret_key) config.set('saml', 'aws_session_token', token.credentials.session_token) # Write the updated config file with open(filename, 'w+') as configfile: config.write(configfile)
在这个代码片段中,我只是在利用变量组合来确定AWS证书文件的位置,读取文件,添加或更新名称为saml的文件,并将变动写回文件。
末了,代码使联合用户对刚刚发生的过程有一个大概的理解。
# Give the user some basic info as to what has just happened print '\n\n----------------------------------------------------------------' print 'Your new access key pair has been stored in the AWS configuration file {0} under the saml profile.'.format(filename) print 'Note that it will expire at {0}.'.format(token.credentials.expiration) print 'After this time you may safely rerun this script to refresh your access key pair.' print 'To use this credential call the AWS CLI with the --profile option (e.g. aws --profile saml ec2 describe-instances).' print '----------------------------------------------------------------\n\n'
如果你的自动化过程是基于CLI的,你可以直接跳到下个部分“将代码进行综合”。此外,如果你的自动化过程是基于API的,当你进行连接时,你只能利用临时安全证书
# Use the AWS STS token to list all of the S3 bucketss3conn = boto.s3.connect_to_region(region, aws_access_key_id=token.credentials.access_key, aws_secret_access_key=token.credentials.secret_key, security_token=token.credentials.session_token) buckets = s3conn.get_all_buckets print 'Simple API example listing all s3 buckets:'print(buckets)
在实践中,将这些附加的API调用放置在一个单独的脚本中,并设置该脚本利用我们前面设置的证书文件,是一个更好的形式。但是这种实践的关键是从AWS STS吸收的证书正用于验证API调用。
将代码进行综合
当你将所有的代码综合起来后,你会看到下面的输出结果。
janedoe@Ubuntu64:/tmp$ ./samlapi.pyUsername: AD\janedoePassword: Please choose the role you would like to assume:[ 0 ]: arn:aws:iam::012345678987:role/ADFS-Administrators[ 1 ]: arn:aws:iam::012345678987:role/ADFS-OperatorsSelection: 1 ---------------------------------------------------------------Your new access key pair has been stored in the aws configuration file /home/janedoe/.aws/credentials under the saml profile.Note that it will expire at 2015-05-26T17:16:20Z.After this time you may safely rerun this script to refresh your access key pair.To use this credential call the aws cli with the --profile option (e.g. aws --profile saml ec2 describe-instances).--------------------------------------------------------------- Simple API example listing all s3 buckets:[<Bucket: mybucket1>, <Bucket: mybucket2>, <Bucket: mybucket3>, <Bucket: mybucket4>, <Bucket: mybucket5>]
从上面的输出结果中我们清楚地看到了什么?
然后你就可以通过引用saml文件来进行后续的API或CLI调用,正如下面的输出结果所示。
janedoe@Ubuntu64:/tmp$ aws --profile saml --output text s3api list-bucketsBUCKETS 2014-09-09T17:11:48.000Z mybucket1BUCKETS 2014-11-03T18:27:35.000Z mybucket2BUCKETS 2014-08-13T02:45:28.000Z mybucket3BUCKETS 2015-01-14T17:53:47.000Z mybucket4BUCKETS 2015-05-19T19:23:25.000Z mybucket5OWNER myowner 128abcedf111aa33cc44ddee5512345abcd6fff4eed
末了要说的是,SAML具有以浏览器为导向的特性。这一特性就哀求一些额外的代码和一些程序,但是它确实完成了目标,即为API和CLI调用开启基于联合的验证!
如果你利用其他的身份供应商或验证机制
如果你正在利用AD FS以外的其他IdP,不要由于该博客帖未包含针对你的办理方案而失落望。我选择利用Python模块集成技能来模拟浏览器行为的缘故原由是,该技能可扩展到险些所有的IdP方案。
相似地,如果你正在利用其他的验证机制,如Kerberos,X.509证书,或MFA(多因子验证),在Python要求模块中有额外的处理办法。在你使根本环境搭建好后,这些处理办法可以用来加强上面的举例。
( 翻译/吕东梅 责编/王鑫贺 )
订阅“AWS中文技能社区”微信公众年夜众号,实时节制AWS技能及产品!
AWS中文技能社区为广大开拓者供应了一个Amazon Web Service技能互换平台,推送AWS最新资讯、技能视频、技能文档、精彩技能博文等干系精彩内容,更有AWS社区专家与您直接沟通互换!
快加入AWS中文技能社区,更快更好的理解AWS云打算技能。