效果展示本文为大家讲述了如何利用Tkinter
制作一个大略的可视化界面临象。有时候,我们用代码实现了某些功能,如果可以为这个功能添加一个界面,是否会觉得倍儿爽?在正式讲述文章之前,先来看看利用Tkinter做出来的终极效果吧!
Tkinter简介Tkinter(也叫 Tk 接口)是 Tk 图形用户界面临象包标准 的 Python 接口。Tk 是一个轻量级的跨平台图形用户界面 (GUI)开拓工具。Tk 和 Tkinter 可以运行在大多数 的 Unix 平台、Windows、和 Macintosh 系统。由于Tkinter是Python自带的标准库,我们想要利用它的时候,只需直接导入即可。
Tkinter常用组件利用先容上述为大家列出了Tkinter中的常用组件。各个组件有其相对应的功能和用法,而我们可以根据我这些控件自由组合来展现出我们想要的效果。这里先给大家大略先容一下常用的,也是本文小工具里会用到的一些组件。1. Button(按钮控件)Button组件是用来触发事宜的,它会在窗口上以按钮的办法显示,在你单击它的时候就会运行与Button绑定的函数。
from tkinter import def b1(): root['bg'] = \"大众blue\公众root = Tk()str1 = \"大众Hello World\公众Button(root,text = str1,command = b1).place(x=0,y=0)root.mainloop()2. Label(标签控件)Label是标签控件,能在指定的窗口中显示的文本和图像。
from tkinter import root = Tk()str1 = \"大众Hello World\"大众Label(root,text=str1).place(x=0,y=0)root.mainloop()3. Entry(文本框)Entry是文本框,用来让用户输入一行文本字符串,也可以用来显示文本字符串。在利用Entry的时候,我们须要用到一个函数stringVar(),这个函数定义的变量会被一贯追踪,当你想要得到该变量当时的值,只须要用该变量的get函数。
from tkinter import def b1(): print(str1.get())root = Tk()str1 = StringVar()str1.set(\公众Hello world\"大众)Entry(root,textvariable = str1).place(x=0,y=5)Button(root,text = \"大众输出\公众,command=b1).place(x=150,y=0)root.mainloop()Tkinter常用几何管理方法利用先容上面先容了一些组件,下面再为大家先容一下Tkinter的一些几何管理方法。所谓的几何管理方法便是用来组织和管理全体父配件区中子配件的布局的。正是有这些几何方法的存在,我们才可以为所欲为的,将组件安排在我们想让它涌现的地方,所有的Tkinter组件都包含专用的几何管理方法。1. pack()pack几何管理,采取块的办法组织配件,常用在开拓大略的界面。pack几何管理程序根据组件创建天生的顺序,将组件添加到父组件中去。如果不指定任何选项,默认在父窗体中自顶向下添加组件。
from tkinter import root = Tk()Button(root,text='1',width=5).pack()Button(root,text='2',width=5).pack()Button(root,text='3',width=5).pack(side=\公众left\公众)Button(root,text='4',width=5).pack(side = \公众right\"大众)Button(root,text='5',width=5).pack(side = \"大众bottom\公众)Button(root,text='6',width=5).pack()root.mainloop()2. grid()grid几何管理,采取表格构造组织配件,通过行(row)列(column)来确定组件摆放的位置,这也是它的两个主要的参数。
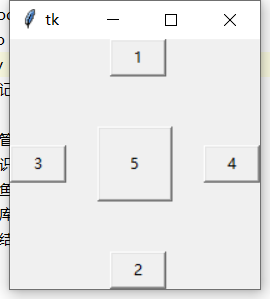
from tkinter import root = Tk()Button(root,text='1',width=5).grid(row=0,column=0)Button(root,text='2',width=5).grid(row=0,column=1)Button(root,text='3',width=5).grid(row=0,column=2)Button(root,text='4',width=5).grid(row=1,column=0)Button(root,text='5',width=5).grid(row=1,column=1)Button(root,text='6',width=5).grid(row=2,column=0)root.mainloop()3. place()place几何管理,许可指定组件的大小以及位置,通过x和y的数值来确定组件的位置,通过width和height来确定组件的大小。
from tkinter import root = Tk()Button(root,text='1',width=5).place(x=80,y=0)Button(root,text='2',width=5).place(x=80,y=170)Button(root,text='3',width=5).place(x=0,y=85)Button(root,text='4',width=5).place(x=155,y=85)Button(root,text='5',width=5).place(x=70,y=70,width=60,height=60)root.mainloop()Tkinter实现弹窗提示有时候,我们想要实现一个弹窗提示功能。此时,可以利用tkinter.messagebox,这个也是Python自带的。在我们须要实现弹窗功能的时候,只须要将其导入,利用对应的函数,再输入对应的参数,一个小弹窗就做好了。
from tkinter import import tkinter.messageboxdef b1(): tkinter.messagebox.showinfo(title=\"大众危险\公众, message=\公众出错了\"大众)root = Tk()Button(root,text='1',command =b1 ).pack()root.mainloop()Tkinter案例讲解通过上述对Tkinter的讲解,我们基本可以上手制作一个属于自己的界面窗口了。末了,还是通过一个案例讲解,为大家讲述它的利用。需求: 我写了一段自动化整理文件夹的窗口,但是想要制作一个界面,能够随意选择路径,当我点击桌面一键整理后,就可以完成文件夹的自动整理。下面是末了制作的界面效果,基本功能都实现了,同时还多出了两个功能,复制所有文件名和韶光提示,是不是很棒?关于自动化整理文件夹的程序,黄同学已经给出了。我在他的根本上,结合Tkinter,终极制作出了这个界面。完全代码如下:
from tkinter.filedialog import askdirectoryfrom tkinter import import timeimport datetimeimport osimport shutilimport pyperclipimport tkinter.messageboxclass MY_GUI():def __init__(self,init_window_name): self.init_window_name = init_window_name self.path = StringVar()def selectPath(self): #选择路径 path_ = askdirectory() self.path.set(path_)def error(self): #缺点弹窗 tkinter.messagebox.showinfo(title=\公众提示\"大众, message=\公众未选择路径\公众)def uptime(self): #更新韶光 TimeLabel[\"大众text\"大众] = datetime.datetime.now().strftime('%Y-%m-%d %H:%M:%S:') + \"大众%d\公众 % (datetime.datetime.now().microsecond // 100000) self.init_window_name.after(100, self.uptime)#设置窗口def set_init_window(self): self.init_window_name.title(\"大众数据剖析与统计学之美\"大众) #窗口标题栏 self.init_window_name.geometry('300x300+600+300') #窗口大小,300x300是窗口的大小,+600是间隔左边距的间隔,+300是间隔上边距的间隔 self.init_window_name.resizable(width=FALSE, height=FALSE) #限定窗口大小,谢绝用户调度边框大小 Label(self.init_window_name, text=\"大众欢迎利用一键整理小工具\"大众,bg=\"大众SkyBlue\"大众,fg = \公众Gray\"大众).place(x=80,y=10) #标签组件,用来显示内容,place里的x、y是标签组件放置的位置 Label(self.init_window_name, text=\"大众当前路径:\公众,bg=\公众SkyBlue\"大众).place(x=15,y=50) #标签组件,用来显示内容,place里的x、y是标签组件放置的位置 Entry(self.init_window_name, textvariable=self.path).place(x=75,y=50) #输入控件,用于显示大略的文本内容 Button(self.init_window_name, text=\"大众路径选择\"大众, command=self.selectPath,bg=\"大众SkyBlue\"大众).place(x=225,y=45) #按钮组件,用来触发某个功能或函数 Button(self.init_window_name, text=\公众桌面一键整理\公众,bg=\"大众SkyBlue\"大众,command=self.option).place(width=200,height=50,x=50,y=100) #按钮组件,用来触发某个功能或函数 Button(self.init_window_name, text=\公众复制所有文件名\公众,bg=\"大众SkyBlue\公众, command=self.option1).place(width=200, height=50, x=50, y=180) #按钮组件,用来触发某个功能或函数 self.init_window_name[\"大众bg\"大众] = \"大众SkyBlue\"大众 #窗口背景色 self.init_window_name.attributes(\"大众-alpha\公众,0.8) #虚化,值越小虚化程度越高global TimeLabel #全局变量 TimeLabel = Label(text=\公众%s%d\"大众 % (datetime.datetime.now().strftime('%Y-%m-%d %H:%M:%S:'), datetime.datetime.now().microsecond // 100000),bg=\"大众SkyBlue\公众) #标签组件,显示韶光 TimeLabel.place(x=80, y=260) self.init_window_name.after(100,self.uptime)def arrangement(self,str1): #整理文件 file_dict = {'图片': ['jpg', 'png', 'gif', 'webp'],'视频': ['rmvb', 'mp4', 'avi', 'mkv', 'flv'],\"大众音频\公众: ['cd', 'wave', 'aiff', 'mpeg', 'mp3', 'mpeg-4'],'文档': ['xls', 'xlsx', 'csv', 'doc', 'docx', 'ppt', 'pptx', 'pdf', 'txt'],'压缩文件': ['7z', 'ace', 'bz', 'jar', 'rar', 'tar', 'zip', 'gz'],'常用格式': ['json', 'xml', 'md', 'ximd'],'程序脚本': ['py', 'java', 'html', 'sql', 'r', 'css', 'cpp', 'c', 'sas', 'js', 'go'],'可实行程序': ['exe', 'bat', 'lnk', 'sys', 'com'],'字体文件': ['eot', 'otf', 'fon', 'font', 'ttf', 'ttc', 'woff', 'woff2'] } os.chdir(str1) folder = os.listdir('.')for each in folder:#print(each.split('.')[-1])for name,type in file_dict.items():if each.split('.')[-1] in type:if not os.path.exists(name): os.mkdir(name) shutil.move(each,name) tkinter.messagebox.showinfo(title=\"大众提示\"大众, message=\公众整理完成\公众)def copy(self,str1): os.chdir(str1) folder = os.listdir('.') str1 = ''for each in folder: type = '.' + each.split('.')[-1] str1 = str1 + each.replace(type,'') + '\n' pyperclip.copy(str1)#获取当前韶光def get_current_time(self): current_time = time.strftime('%Y-%m-%d %H:%M:%S',time.localtime(time.time()))return current_timedef option(self):if self.path.get() == \公众\公众: self.error()else: self.arrangement(self.path.get())def option1(self):if self.path.get() == \公众\"大众: self.error()else: self.copy(self.path.get())if __name__ == '__main__': init_window = Tk() # 实例化出一个父窗口 ZMJ_PORTAL = MY_GUI(init_window) ZMJ_PORTAL.set_init_window() init_window.mainloop()从代码里可以看到,为了窗口的整体都雅,我们规定了窗口的大小。
#窗口大小,300x300是窗口的大小,+600是间隔左边距的间隔,+300是间隔上边距的间隔self.init_window_name.geometry('300x300+600+300')
#窗口标题栏self.init_window_name.title(\"大众数据剖析与统计学之美\"大众) #限定窗口大小,谢绝用户调度边框大小 self.init_window_name.resizable(width=FALSE, height=FALSE) #虚化,值越小虚化程度越高 self.init_window_name.attributes(\"大众-alpha\"大众,0.8) #窗口背景色 self.init_window_name[\公众bg\"大众] = \"大众SkyBlue\公众 所有组件都用了place几何方法,将组件的大小及布局,进行了良好的方案。同时,Button组件也都与其对应的功能函数,进行了链接。
#标签组件,用来显示内容,place里的x、y是标签组件放置的位置Label(self.init_window_name, text=\"大众欢迎利用一键整理小工具\公众,bg=\"大众SkyBlue\"大众,fg = \"大众Gray\"大众).place(x=80,y=10) #标签组件,用来显示内容,place里的x、y是标签组件放置的位置Label(self.init_window_name, text=\"大众当前路径:\公众,bg=\公众SkyBlue\"大众).place(x=15,y=50) #输入控件,用于显示大略的文本内容Entry(self.init_window_name, textvariable=self.path).place(x=75,y=50) #按钮组件,用来触发某个功能或函数 Button(self.init_window_name, text=\"大众路径选择\"大众,command=self.selectPath,bg=\"大众SkyBlue\公众).place(x=225,y=45) #按钮组件,用来触发某个功能或函数Button(self.init_window_name, text=\公众桌面一键整理\"大众,bg=\"大众SkyBlue\"大众,command=self.option).place(width=200,height=50,x=50,y=100) #按钮组件,用来触发某个功能或函数Button(self.init_window_name, text=\"大众复制所有文件名\"大众,bg=\公众SkyBlue\"大众, command=self.option1).place(width=200, height=50, x=50, y=180) 如果路径为空的时候,须要制作一个弹窗提示:未选择路径。
def option(self):if self.path.get() == \公众\公众: self.error()else: self.arrangement(self.path.get())def error(self): #缺点弹窗 tkinter.messagebox.showinfo(title=\公众提示\"大众, message=\"大众未选择路径\公众)程序打包与代码获取程序打包我采取的是pyinstaller命令,在利用该命令前,最主要确当然便是安装啦!
#安装pip install pyinstaller#打包指令pyinstaller -F 数据剖析与统计学之美.py在命令终端输入安装命令,下载安装pyinstaller。下载完成后再切换到存放.py文件的目录里,运行打包指令,待运行结束,我们可以看到目录里多出了一些文件夹和文件。