自旋锁和排他锁
鉴于实现锁的办法不同,那么这里利用策略模式来组织代码

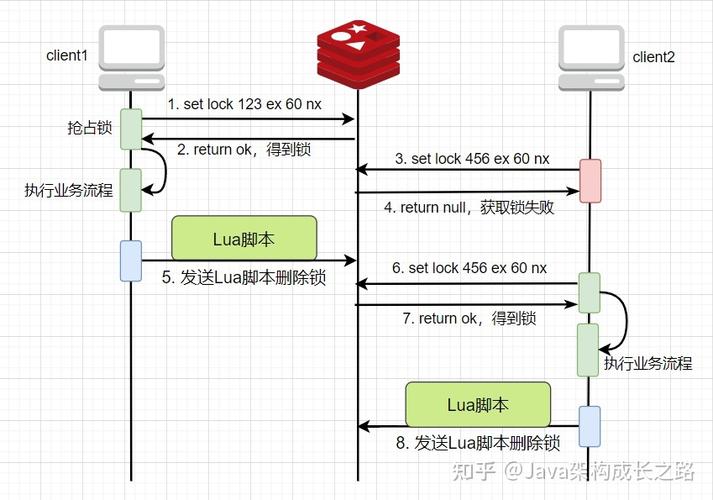
一、自旋锁
分布式锁抽象策略接口
package com.srr.lock;
/
@Description 分布式锁的接口
/
abstract public interface DistributedLock {
/
获取锁
/
boolean lock();
/
解锁
/
void unlock();
}
自旋锁策略抽象类,利用模板方法模式构建
package com.srr.lock;
/
自旋锁策略模板
/
public abstract class SpinRedisLockStrategy implements DistributedLock {
private static final Integer retry = 50; //默认重试5次
private static final Long sleeptime = 100L;
protected String lockKey;
protected String requestId;
protected int expireTime;
private SpinRedisLockStrategy(){}
public SpinRedisLockStrategy(String lockKey, String requestId, int expireTime){
this.lockKey=lockKey;
this.requestId=requestId;
this.expireTime=expireTime;
}
/
模板方法,搭建的获取锁的框架,详细逻辑交于子类实现
/
@Override
public boolean lock() {
Boolean flag = false;
try {
for (int i=0;i<retry;i++){
flag = tryLock();
if(flag){
System.out.println(Thread.currentThread().getName()+"获取锁成功");
break;
}
Thread.sleep(sleeptime);
}
}catch (Exception e){
e.printStackTrace();
}
return flag;
}
/
考试测验获取锁,子类实现
/
protected abstract boolean tryLock() ;
/
解锁:删除key
/
@Override
public abstract void unlock();
}
自旋锁实现子类
package com.srr.lock;
import redis.clients.jedis.Jedis;
import java.util.Collections;
/
自旋锁
/
public class SpinRedisLock extends SpinRedisLockStrategy{
private static final Long RELEASE_SUCCESS = 1L;
private static final String LOCK_SUCCESS = "OK";
private static final String SET_IF_NOT_EXIST = "NX";
private static final String SET_WITH_EXPIRE_TIME = "PX";
public SpinRedisLock(String lockKey, String requestId, int expireTime) {
super(lockKey,requestId, expireTime);
}
@Override
protected boolean tryLock() {
Jedis jedis = new Jedis("localhost", 6379); //创建客户端,1p和端口号
String result = jedis.set(lockKey, requestId, SET_IF_NOT_EXIST, SET_WITH_EXPIRE_TIME, expireTime);
if(LOCK_SUCCESS.equals(result)) {
return true;
}
return false;
}
@Override
public void unlock() {
Jedis jedis = new Jedis("localhost", 6379); //创建客户端,1p和端口号
String script = "if redis.call('get', KEYS[1]) == ARGV[1] then return redis.call('del', KEYS[1]) else return 0 end";
Object result = jedis.eval(script, Collections.singletonList(lockKey), Collections.singletonList(requestId));
if(RELEASE_SUCCESS.equals(result)) {
System.out.println("lock is unlock");
}
}
}
至此,自旋锁办法实现分布式锁就完成了,下面来看排他锁壅塞的办法实现
二、排他锁
在实现之前须要大家搞懂一个观点,也便是redis的事宜关照:
/<br> 键空间关照,所有关照以 keyspace@ 为前缀<br> 键事宜关照,所有关照以 keyevent@ 为前缀<br> 所有命令都只在键真的被改动了之后,才会产生关照,比如删除foo会产生<br> 键空间关照<br> “pmessage”,"__ key__ : “,”__ keyspace@0__:foo",“set”<br> 和键事宜关照<br> “pmessage”,"__ key__ : ","__ keyevent@0__:set",“foo”<br> /
搞懂观点之后,须要在redis的配置文件redis.conf中将其 notify-keyspace-events “KEA”,默认为notify-keyspace-events “”,这样才能启动redis的事宜监听机制。
排它锁策略抽象类
package com.srr.lock;
import redis.clients.jedis.Jedis;
/
@Description 壅塞获取锁,模板类
/
public abstract class BlockingRedisLockStrategy implements DistributedLock {
protected String lockKey;
protected String requestId;
protected int expireTime;
private BlockingRedisLockStrategy(){}
public BlockingRedisLockStrategy(String lockKey, String requestId,int expireTime){
this.lockKey=lockKey;
this.requestId=requestId;
this.expireTime=expireTime;
}
/
模板方法,搭建的获取锁的框架,详细逻辑交于子类实现
@throws Exception
/
@Override
public final boolean lock() {
//获取锁成功
if (tryLock()){
System.out.println(Thread.currentThread().getName()+"获取锁成功");
return true;
}else{ //获取锁失落败
//壅塞一贯等待
waitLock();
//递归,再次获取锁
return lock();
}
}
/
考试测验获取锁,子类实现
/
protected abstract boolean tryLock() ;
/
等待获取锁,子类实现
/
protected abstract void waitLock();
/
解锁:删除key
/
@Override
public abstract void unlock();
}
排他锁实现子类
package com.srr.lock;
import redis.clients.jedis.Jedis;
import java.util.Collections;
/
排他锁,壅塞
/
public class BlockingRedisLock extends BlockingRedisLockStrategy {
private static final Long RELEASE_SUCCESS = 1L;
private static final String LOCK_SUCCESS = "OK";
private static final String SET_IF_NOT_EXIST = "NX";
private static final String SET_WITH_EXPIRE_TIME = "PX";
public BlockingRedisLock(String lockKey, String requestId, int expireTime) {
super(lockKey,requestId, expireTime);
}
/
考试测验获取分布式锁
@return 是否获取成功
/
@Override
public boolean tryLock() {
Jedis jedis = new Jedis("localhost", 6379); //创建客户端,1p和端口号
String result = jedis.set(lockKey, requestId, SET_IF_NOT_EXIST, SET_WITH_EXPIRE_TIME, expireTime);
if (LOCK_SUCCESS.equals(result)) {
return true;
}
return false;
}
@Override
public void waitLock() {
//判断key是否存在
Jedis jedis = new Jedis("localhost", 6379); //创建客户端,1p和端口号
KeyExpiredListener keyExpiredListener = new KeyExpiredListener();
/
键空间关照,所有关照以 keyspace@ 为前缀
键事宜关照,所有关照以 keyevent@ 为前缀
所有命令都只在键真的被改动了之后,才会产生关照,比如删除foo会产生
键空间关照
“pmessage”,"__ key__ : “,”__ keyspace@0__:foo",“set”
和键事宜关照
“pmessage”,"__ key__ : ","__ keyevent@0__:set",“foo”
/
//如果要监听某个key的实行了什么操作,就订阅__ keyspace@0__,监听某种操作动了哪些key,就订阅__ keyevent@0__
//这里我们须要监听分布式锁的键被删除了,以是要监听删除动作"__keyspace@0__:"+key
jedis.psubscribe(keyExpiredListener, "__keyspace@0__:"+lockKey);
System.out.println("over");
}
/
开释分布式锁
@return 是否开释成功
/
@Override
public void unlock() {
Jedis jedis = new Jedis("localhost", 6379); //创建客户端,1p和端口号
String script = "if redis.call('get', KEYS[1]) == ARGV[1] then return redis.call('del', KEYS[1]) else return 0 end";
Object result = jedis.eval(script, Collections.singletonList(lockKey), Collections.singletonList(requestId));
if (RELEASE_SUCCESS.equals(result)) {
System.out.println("lock is unlock");
}
}
}
redis事宜监听类
package com.srr.lock;
import redis.clients.jedis.JedisPubSub;
/
redis 事宜监听器
/
public class KeyDelListener extends JedisPubSub {
public KeyDelListener(){
}
// 初始化订阅时候的处理
@Override
public void onPSubscribe(String pattern, int subscribedChannels) {
}
// 取得订阅的后的处理
@Override
public void onPMessage(String pattern, String channel, String message) {
System.out.println("message == "+message);
this.punsubscribe();
System.out.println("unsubscribe == "+message);
}
}
实在比拟一下,两者的差异在于lock的实现办法不同,笔者为了确保代码完全性就全部贴上了。
那么给一个场景测试一下我们的代码有没有问题,请看下面的测试代码:
这里我们构建一个Lock工具类:
package com.srr.lock;
/
锁工具类
/
public class Lock {
/
获取锁
/
boolean lock(DistributedLock lock) {
return lock.lock();
};
/
开释锁
/
void unlock(DistributedLock lock) {
lock.unlock();
};
}
测试类:
package com.srr.lock;
import redis.clients.jedis.Jedis;
/
测试场景
count从1加到101
利用redis分布式锁在分布式环境下担保结果精确
/
public class T {
volatile int count = 1;
public void inc(){
for(int i = 0;i<100;i++){
try {
Thread.sleep(10);
} catch (InterruptedException e) {
e.printStackTrace();
}
count++;
System.out.println("count == "+count);
}
}
public int getCount(){
return count;
}
public static void main(String[] args) {
final T t = new T();
final Lock lock = new Lock();
//final RedisLock redisLock = new BlockingRedisLock("","1",100000,jedis);
final DistributedLock distributedLock = new SpinRedisLock("test","1",100000);
Thread t1 = new Thread(new Runnable() {
@Override
public void run() {
if(lock.lock(distributedLock)){
t.inc();
System.out.println("t1 running");
System.out.println("t1 == count == "+ t.getCount());
lock.unlock(distributedLock);
}
}
});
Thread t2 = new Thread(new Runnable() {
@Override
public void run() {
if(lock.lock(distributedLock)) {
t.inc();
System.out.println("t2 running");
System.out.println("t2 == count == " + t.getCount());
lock.unlock(distributedLock);
}
}
});
t1.start();
t2.start();
}
}
测试结果:
如果想利用zookeeper实现分布式锁只须要抽象出一个策略类实现DistributedLock接口即可。