1.5.2、内存监控命令
free -m
df iotop iostat# 安装 yum install iotop sysstat -y

1.5.4、网络监控命令
ifconfig、route、glances、iftop、nethogs、netstat# 安装 yum install -y netstat iftop 中间的<= =>这两个旁边箭头,表示的是流量的⽅向。 TX:发送流量、RX:吸收流量、TOTAL:总流量# 查看TCP11中状态netstat -an|grep ESTABLISHEDnetstat -rn #查看路由信息netstat -lntup
1.6、Shell脚本进行大略监控
需求: 每隔1分钟监控⼀次内存,当你的可⽤内存低于100m,发邮件报警,哀求显示剩余内存
1.怎么获取内存可⽤的值 free -m|awk '/^Mem/{print $NF}'
2.获取到内存可⽤的值如何和设定的阈值进⾏⽐较
3.⽐较如果⼤于100m则不处理,如果⼩于100则报警
4.如何每隔1分钟执⾏⼀次
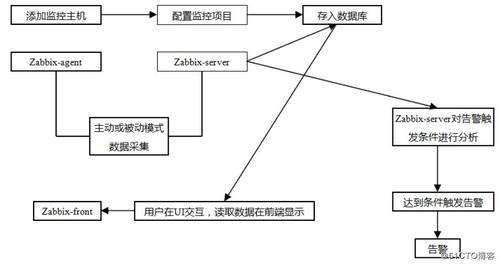
[root@zabbix-server ~]# cat free.sh #!/usr/bin/bashHostName=$(hostname)_$(hostname -i)Date=$(date +%F)while true;do Free=$(free -m|awk '/^Mem/{print $NF}') if [ $Free -le 100 ];then echo "$Date: $HostName Mem Is < ${Free}MB" fi sleep 5done二、Zabbix概述及安装2.1、Zabbix概述2.2、Zabbix根本架构
zabbix安装步骤:https://www.zabbix.com/download
1)配置zabbix仓库
[root@zabbix-server ~]# rpm -Uvh https://repo.zabbix.com/zabbix/5.0/rhel/7/x86_64/zabbix-release-5.0-1.el7.noarch.rpm[root@zabbix-server ~]# yum clean all
2)安装Zabbix server 和 agent
[root@zabbix-server ~]# yum install zabbix-server-mysql zabbix-agent -y
3)安装zabbix前端
# 1、安装centos-release-scl[root@zabbix-server ~]# yum install centos-release-scl -y# 2、配置/etc/yum.repos.d/zabbix.repo[root@zabbix-server ~]# vim /etc/yum.repos.d/zabbix.repo[zabbix-frontend]name=Zabbix Official Repository frontend - $basearchbaseurl=http://repo.zabbix.com/zabbix/5.0/rhel/7/$basearch/frontendenabled=1 #配置zabbix-frontend生效gpgcheck=1gpgkey=file:///etc/pki/rpm-gpg/RPM-GPG-KEY-ZABBIX-A14FE591# 3、安装zabbix前端包[root@zabbix-server ~]# yum install zabbix-web-mysql-scl zabbix-nginx-conf-scl -y
4)安装mysql并初始化
# 安装mysql5.7[root@zabbix-server ~]# cd /usr/local/src/[root@zabbix-server src]# wget http://repo.mysql.com/mysql57-community-release-el7-8.noarch.rpm[root@zabbix-server src]# rpm -ivh mysql57-community-release-el7-8.noarch.rpm[root@zabbix-server src]# yum -y install mysql-server# 启动mysql并查看初始化密码[root@zabbix-server src]# systemctl start mysqld[root@zabbix-server src]# systemctl enable mysqld[root@zabbix-server src]# netstat -lntp|grep 3306tcp6 0 0 :::3306 ::: LISTEN 2045/mysqld[root@zabbix-server src]# grep 'temporary password' /var/log/mysqld.log2021-02-13T02:27:31.983845Z 1 [Note] A temporary password is generated for root@localhost: .&Ewqebl31,# 登录mysql并修正密码[root@zabbix-server src]# mysql -uroot -p'.&Ewqebl31,'mysql> set password for root@localhost = password('Root123@@'); #密码须要尽可能繁芜# 初始化mysqlmysql> create database zabbix character set utf8 collate utf8_bin;mysql> create user zabbix@localhost identified by 'Zabbix123@@';mysql> grant all privileges on zabbix. to zabbix@localhost;mysql> quit# 导入zabbix初始数据(166张表)[root@zabbix-server src]# zcat /usr/share/doc/zabbix-server-mysql/create.sql.gz | mysql -uzabbix -p zabbix
5)配置Zabbix server连接数据库
[root@zabbix-server src]# vim /etc/zabbix/zabbix_server.confDBPassword=Zabbix123@@
6)zabbix前端配置
# 打开注释并配置域名[root@zabbix-server src]# vim /etc/opt/rh/rh-nginx116/nginx/conf.d/zabbix.conflisten 80;server_name dianchou.com;#配置php-fpm[root@zabbix-server src]# vim /etc/opt/rh/rh-php72/php-fpm.d/zabbix.conflisten.acl_users = apache,nginx #添加nginx用户php_value[date.timezone] = Asia/Shanghai #修正时区# 配置nginx,注释默认配置[root@zabbix-server src]# vim /etc/opt/rh/rh-nginx116/nginx/nginx.conf# server {# listen 80 default_server;# listen [::]:80 default_server;# server_name _;# root /opt/rh/rh-nginx116/root/usr/share/nginx/html;....
7)启动zabbix server及agent
[root@zabbix-server src]# systemctl restart zabbix-server zabbix-agent rh-nginx116-nginx rh-php72-php-fpm[root@zabbix-server src]# systemctl enable zabbix-server zabbix-agent rh-nginx116-nginx rh-php72-php-fpm
8)访问zabbix并配置
浏览器访问:http://ip或http://域名
查看配置的信息:
[root@zabbix-server src]# cat /etc/zabbix/web/zabbix.conf.php <?php// Zabbix GUI configuration file.$DB['TYPE'] = 'MYSQL';$DB['SERVER'] = 'localhost';$DB['PORT'] = '0';$DB['DATABASE'] = 'zabbix';$DB['USER'] = 'zabbix';$DB['PASSWORD'] = 'Zabbix123@@';// Schema name. Used for PostgreSQL.$DB['SCHEMA'] = '';// Used for TLS connection.$DB['ENCRYPTION'] = false;$DB['KEY_FILE'] = '';$DB['CERT_FILE'] = '';$DB['CA_FILE'] = '';$DB['VERIFY_HOST'] = false;$DB['CIPHER_LIST'] = '';// Use IEEE754 compatible value range for 64-bit Numeric (float) history values.// This option is enabled by default for new Zabbix installations.// For upgraded installations, please read database upgrade notes before enabling this option.$DB['DOUBLE_IEEE754'] = true;$ZBX_SERVER = 'localhost';$ZBX_SERVER_PORT = '10051';$ZBX_SERVER_NAME = '';$IMAGE_FORMAT_DEFAULT = IMAGE_FORMAT_PNG;// Uncomment this block only if you are using Elasticsearch.// Elasticsearch url (can be string if same url is used for all types).//$HISTORY['url'] = [// 'uint' => 'http://localhost:9200',// 'text' => 'http://localhost:9200'//];// Value types stored in Elasticsearch.//$HISTORY['types'] = ['uint', 'text'];// Used for SAML authentication.// Uncomment to override the default paths to SP private key, SP and IdP X.509 certificates, and to set extra settings.//$SSO['SP_KEY'] = 'conf/certs/sp.key';//$SSO['SP_CERT'] = 'conf/certs/sp.crt';//$SSO['IDP_CERT'] = 'conf/certs/idp.crt';//$SSO['SETTINGS'] = [];
9)登录zabbix
默认的账号及密码: 用户名:Admin,密码:zabbix
10)修正默认密码并设置措辞环境
User setting =>User => Change password
2.4、Zabbix Agent安装
准备一台做事器作为zabbix agent端
1)安装zabbix agent
[root@web01 ~]# rpm -ivh https://mirror.tuna.tsinghua.edu.cn/zabbix/zabbix/5.0/rhel/7/x86_64/zabbix-agent-5.0.1-1.el7.x86_64.rpm[root@web01 ~]# rpm -ql zabbix-agent/etc/logrotate.d/zabbix-agent/etc/zabbix/zabbix_agentd.conf/etc/zabbix/zabbix_agentd.d/usr/lib/systemd/system/zabbix-agent.service/usr/lib/tmpfiles.d/zabbix-agent.conf/usr/sbin/zabbix_agentd/usr/share/doc/zabbix-agent-5.0.1/usr/share/doc/zabbix-agent-5.0.1/AUTHORS/usr/share/doc/zabbix-agent-5.0.1/COPYING/usr/share/doc/zabbix-agent-5.0.1/ChangeLog/usr/share/doc/zabbix-agent-5.0.1/NEWS/usr/share/doc/zabbix-agent-5.0.1/README/usr/share/doc/zabbix-agent-5.0.1/userparameter_mysql.conf/usr/share/man/man8/zabbix_agentd.8.gz/var/log/zabbix/var/run/zabbix
2)配置 Zabbix-Agent 指向 Zabbix-Server
[root@web01 ~]# vim /etc/zabbix/zabbix_agentd.confServer=10.0.0.101
3)启动 Zabbix-Agent , 默认监听在 10050 端⼝
[root@web01 ~]# systemctl start zabbix-agent[root@web01 ~]# systemctl enable zabbix-agent[root@web01 ~]# netstat -lntpActive Internet connections (only servers)Proto Recv-Q Send-Q Local Address Foreign Address State PID/Program name tcp 0 0 0.0.0.0:22 0.0.0.0: LISTEN 918/sshd tcp 0 0 0.0.0.0:10050 0.0.0.0: LISTEN 1054/zabbix_agentd tcp6 0 0 :::22 ::: LISTEN 918/sshd tcp6 0 0 :::10050 ::: LISTEN 1054/zabbix_agentd
4)配置ZabbixWeb⻚⾯,点击配置->选择主机->创建主机
5)点击模板->选择连接指示器->选择->搜索Linux->点击⼩按钮添加->末了添加
6)等待几秒,查看添加的监控主机
2.5、中文乱码问题办理
办理方法一:
1)先搜索zabbix-web包对应字符存放的目录
[root@zabbix-server ~]# rpm -ql zabbix-web|grep fonts/usr/share/zabbix/assets/fonts
2)进入对应的字体目录,创造字体是一个软连接
[root@zabbix-server ~]# cd /usr/share/zabbix/assets/fonts[root@zabbix-server fonts]# lltotal 0lrwxrwxrwx 1 root root 33 Feb 13 10:22 graphfont.ttf -> /etc/alternatives/zabbix-web-font
3)进入软连接对应的目录,创造还是软连接
[root@zabbix-server fonts]# cd /etc/alternatives[root@zabbix-server alternatives]# lltotal 0lrwxrwxrwx. 1 root root 15 Aug 9 2018 ld -> /usr/bin/ld.bfdlrwxrwxrwx. 1 root root 34 Aug 9 2018 libnssckbi.so.x86_64 -> /usr/lib64/pkcs11/p11-kit-trust.solrwxrwxrwx 1 root root 26 Feb 13 10:25 mta -> /usr/sbin/sendmail.postfixlrwxrwxrwx 1 root root 40 Feb 13 10:25 mta-aliasesman -> /usr/share/man/man5/aliases.postfix.5.gzlrwxrwxrwx 1 root root 22 Feb 13 10:25 mta-mailq -> /usr/bin/mailq.postfixlrwxrwxrwx 1 root root 38 Feb 13 10:25 mta-mailqman -> /usr/share/man/man1/mailq.postfix.1.gzlrwxrwxrwx 1 root root 27 Feb 13 10:25 mta-newaliases -> /usr/bin/newaliases.postfixlrwxrwxrwx 1 root root 43 Feb 13 10:25 mta-newaliasesman -> /usr/share/man/man1/newaliases.postfix.1.gzlrwxrwxrwx 1 root root 23 Feb 13 10:25 mta-pam -> /etc/pam.d/smtp.postfixlrwxrwxrwx 1 root root 22 Feb 13 10:25 mta-rmail -> /usr/bin/rmail.postfixlrwxrwxrwx 1 root root 25 Feb 13 10:25 mta-sendmail -> /usr/lib/sendmail.postfixlrwxrwxrwx 1 root root 41 Feb 13 10:25 mta-sendmailman -> /usr/share/man/man1/sendmail.postfix.1.gzlrwxrwxrwx 1 root root 29 Feb 13 10:16 zabbix-server -> /usr/sbin/zabbix_server_mysqllrwxrwxrwx 1 root root 38 Feb 13 10:22 zabbix-web-font -> /usr/share/fonts/dejavu/DejaVuSans.ttf
4)进入终极字体存放的目录,上传准备好的字体(可以通过windows电脑获取),改名为DejaVuSans.ttf即可
办理方法二:
1)在zabbix-server做事器上安装如下文件符集
[root@zabbix-server ~]# yum install wqy-microhei-fonts -y
2)更换linux上默认的字符集
[root@zabbix-server ~]# cp /usr/share/fonts/wqy-microhei/wqy-microhei.ttc /usr/share/fonts/dejavu/DejaVuSans.ttf
3)重启zabbix-server,查看乱码是否办理
[root@zabbix-server ~]# systemctl restart zabbix-server