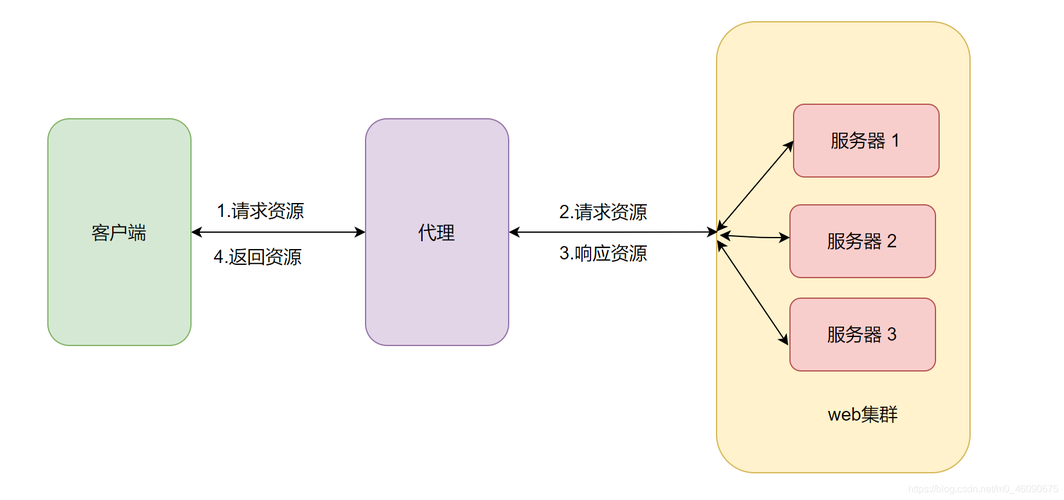
反向代理--“反向代理(Reverse Proxy)办法是指以代理做事器来接管internet上的连接要求,然后将要求转发给内部网络上的做事器,并将从做事器上得到的结果返回给internet上要求连接的客户端,此时期理做事器对外就表现为一个反向代理做事器。”
负载均衡--“网络专用术语,负载均衡建立在现有网络构造之上,它供应了一种廉价有效透明的方法扩展网络设备和做事器的带宽、增加吞吐量、加强网络数据处理能力、提高网络的灵巧性和可用性。”

1.几个观点
反向代理:在收到客户端要求之后,会修目标IP地址和端口
正向代理:在收到客户端要求之后,会修源IP地址和端口
上游做事器:代理做事器后真个哪些真正给客户端供应做事的节点,这样的做事器称之为上游做事器
下贱做事器:客户端便是下贱节点
2.反向代理指令
模块:nginx_http_proxy_module 指令 proxy_pass:指定上游做事器的ip和端口 proxy_set_header:指定在重新封装要求报文的时候,添加一个新的首部 Syntax: proxy_pass URL; Default: — Context: location, if in location, limit_except 例子:proxy_pass http://10.220.5.200:80; Syntax: proxy_set_header field value; Default: proxy_set_header Host $proxy_host; Context: http, server, location
3.反向代理大略示例
location / { proxy_pass http://10.220.5.180; proxy_set_header X-Real-IP $remote_addr proxy_set_header Host $proxy_host; }
4.反向代理实战案例
1.环境准备
centos7.5
反向代理做事器IP:172.20.10.7/28
web1做事器IP:172.20.10.8/28
web2做事器IP:172.20.10.9/28
2.配置反向代理做事器端
yum安装nignx须要配置网络源,复制下面的代码到你的yum仓库中
[ken]name=kenenabled=1gpgcheck=0baseurl=https://mirrors.aliyun.com/epel/7Server/x86_64/
安装nginx
[root@ken ~]# yum install nginx -y
配置nginx文件,我们实现这样一个效果,静态文件都被代理到172.20.10.8,动态文件都被调度到172.20.10.9,实现动静分离。
[root@ken ~]# vim /etc/nginx/nginx.conf# For more information on configuration, see:# Official English Documentation: http://nginx.org/en/docs/# Official Russian Documentation: http://nginx.org/ru/docs/user nginx;worker_processes auto;error_log /var/log/nginx/error.log;pid /run/nginx.pid;# Load dynamic modules. See /usr/share/nginx/README.dynamic.include /usr/share/nginx/modules/.conf;events { worker_connections 1024;}http { log_format main '$remote_addr - $remote_user [$time_local] \公众$request\"大众 ' '$status $body_bytes_sent \"大众$http_referer\"大众 ' '\"大众$http_user_agent\"大众 \公众$http_x_forwarded_for\"大众';access_log /var/log/nginx/access.log main; sendfile on; tcp_nopush on; tcp_nodelay on; keepalive_timeout 65; types_hash_max_size 2048; include /etc/nginx/mime.types; default_type application/octet-stream; # include /etc/nginx/conf.d/.conf; server { listen 80 default_server; listen [::]:80 default_server; server_name _; root /var/www/html; index index.html index.php; # Load configuration files for the default server block. location / { proxy_pass http://172.20.10.8; proxy_set_header host $proxy_host; proxy_set_header realip $remote_addr; } location ~^/.(\.php)$ { proxy_pass http://172.20.10.9; proxy_set_header host $proxy_host; proxy_set_header realip $remote_addr; } error_page 404 /404.html; location = /40x.html { } error_page 500 502 503 504 /50x.html; location = /50x.html { } }}
进行语法检测
[root@ken ~]# nginx -tnginx: the configuration file /etc/nginx/nginx.conf syntax is oknginx: configuration file /etc/nginx/nginx.conf test is successful
检讨没有问题之后进行重启
[root@ken ~]# systemctl start nginx
3.配置web做事器端
安装apache
[root@ken ~]# yum install httpd -y
准备测试文件,172.20.10.8准备静态文件
[root@ken ~]# echo \公众this is 172.20.10.8 for static test\"大众>/var/www/html/index.html
172.20.10.9须要下载php以便支持动态文件
[root@ken html]# yum install php -y
172.20.10.9准备动态文件,
[root@ken ~]# cd /var/www/html/[root@ken html]# vim index.php<?phpphpinfo();?>
4.web做事看重启
[root@ken html]# systemctl restart httpd
5.关闭安全做事
[root@ken ~]# iptables -F
6.浏览器测试
要求静态文件测试
静态文件要求已经成功转发至172.20.10.8。
测试成功!
要求动态文件测试
动态文件要求已经成功转发至172.20.10.9.
测试成功!
7.补充
补充一
补充1: location如下 location /admin { proxy_pass http://www.ken.com/; proxy_pass http://www.ken.com; } 要求的url 是http://www.ken.com/admin/a.html 如果代理办法是 proxy_pass http://www.ken.com/; 那么去www.ken.com的跟目录下找a.html,/代表完备代理。 如果代理办法是 proxy_pass http://www.ken.com; 那么去www.ken.com的跟目录下的admin找a.html
补充二
补充2: 如果location中利用了模式匹配(正则),那么,location中的url会直接补充到代理节点的后面. 此时,上游做事器的的后面不能有任何内容,包括 / location ~ \.php$ { proxy_pass http://www.ken.com; [正则表达式proxy_pass转发的地址后面什么都不能加] <<< 精确写法 proxy_pass http://www.ken.com:80; <<< 精确写法 proxy_pass http://www.ken.com/; <<< 缺点写法 proxy_pass http://www.ken.com/img; <<< 缺点写法 } 此时,如果要求的url是 http://www.baidu.com/book/stu/a.php ,就会代理成 http://www.ken.com/book/stu/a.php
补充三
补充3: 在location中如果有重定向的话,那么就用重定向后的uri更换掉代理节点中的uri location / { rewrite /(.)$ /index.php?name=$1 break; proxy_pass http://www.baidu.com:80/img; } 此时,如果要求的url是 http://www.ken.com/bajie ,就会代理成 www.baidu.com/index.php?name=bajie3.nginx实现负载均衡
1.几个观点
调度器:分发用户的要求到一个后端节点
上游做事器(真实做事器):每个真正用来处理用户要求的节点都是一个上游做事器
CIP:客户真个IP地址
RIP:真实做事器的IP地址
VIP:虚拟IP,用户所看到的是也是虚拟IP
2.指令
指令:upstream 浸染:定义一个上游做事器组 格式 upstream name { server 上游做事器1 参数 参数; server 上游做事器1 参数 参数; server 上游做事器1 参数 参数; }
3.主要参数
weight=#:设置做事器的权重(数字越大,权重越高) backup: 设置做事器处于备用状态(其他节点涌现故障,备用节点才开始事情) down:设置让一个节点处于离线状态(常常用在掩护一个节点的情形下) max_fails=number:设置连续几次转发失落败就认为该节点涌现故障,然后就不再向该节点转发用户要求了 fail_timeout=time: 和上个参数组合利用,浸染是设置等待上游做事器相应超时时间
4.nginx实现负载均衡实战案例
1.环境准备
centos7.5
nginx做事器IP:172.20.10.7/28
web1做事器端IP:172.20.10.8/28
web2做事器端IP:172.20.10.9/28
2.配置nginx做事器端
安装nginx略
配置nginx文件
[root@ken ~]# vim /etc/nginx/nginx.conf# For more information on configuration, see:# Official English Documentation: http://nginx.org/en/docs/# Official Russian Documentation: http://nginx.org/ru/docs/user nginx;worker_processes auto;error_log /var/log/nginx/error.log;pid /run/nginx.pid;# Load dynamic modules. See /usr/share/nginx/README.dynamic.include /usr/share/nginx/modules/.conf;events { worker_connections 1024;}http { log_format main '$remote_addr - $remote_user [$time_local] \公众$request\"大众 ' '$status $body_bytes_sent \公众$http_referer\"大众 ' '\"大众$http_user_agent\"大众 \"大众$http_x_forwarded_for\公众'; access_log /var/log/nginx/access.log main; sendfile on; tcp_nopush on; tcp_nodelay on; keepalive_timeout 65; types_hash_max_size 2048; include /etc/nginx/mime.types; default_type application/octet-stream; # include /etc/nginx/conf.d/.conf; upstream ken { server 172.20.10.8 weight=1 max_fails=3 fail_timeout=5; server 172.20.10.9 weight=2 max_fails=3 fail_timeout=5; } server { listen 80 default_server; listen [::]:80 default_server; server_name _; root /var/www/html; index index.php index.html; # Load configuration files for the default server block. # include /etc/nginx/default.d/.conf; location / { proxy_pass http://ken/; proxy_set_header host $proxy_host; proxy_set_header realip $remote_addr; } error_page 404 /404.html; location = /40x.html { } error_page 500 502 503 504 /50x.html; location = /50x.html { } }}
语法检测
[root@ken ~]# nginx -tnginx: the configuration file /etc/nginx/nginx.conf syntax is oknginx: configuration file /etc/nginx/nginx.conf test is successful
重启nginx
[root@ken ~]# systemctl restart nginx
3.配置web做事器端
略.和上面反向代理配置一样。
4.浏览器测试
输入nginx做事器真个IP地址
由于172.20.10.9的权重为2,即涌现两次172.20.10.9才会涌现一次172.20.10.8.进行刷新测试
测试成功!
nginx的三大功能,缓存,反向代理,负载均衡,已经全部讲解完毕,是否对nginx有了全新的认识那?立时自己动手实验一下吧